


Step-by-step setup guide for a local Windows environment
Ataccama MDM 17.1 introduces an experimental Model Context Protocol (MCP) Server that enables AI assistants to access MDM metadata, records, relationships, and tasks.
This guide explains how to configure the MDM MCP Server, enable OAuth 2.0 authentication through Keycloak, and connect Claude Desktop using mcp-remote.
The integration allows users to retrieve MDM records and explore available metadata using natural-language queries.
1. Prerequisites
Ensure the following components are available:
| Component | Requirement |
|---|---|
| Ataccama MDM | Version 17.1 with MCP Server support |
| Keycloak | Administrator access to the MDM realm |
| MDM Server configuration | Access to application.properties |
| Claude Desktop | Installed and authenticated |
| Node.js | Installed with npm and npx |
| npm registry | Accessible for downloading mcp-remote |
The local environment used in this guide has the following configuration:
| Component | Address |
|---|---|
| MDM Server | http://localhost:8051 |
| MCP endpoint | http://localhost:8051/mcp |
| Keycloak | http://localhost:8083 |
| Keycloak realm | ataccamaone |
Connection architecture
2. Configure Keycloak
The MDM MCP Server acts as an OAuth 2.0 protected resource and uses Keycloak for authentication.
2.1. Create the MCP client scope
Open the Keycloak Admin Console.
Navigate to Client scopes → Create client scope.
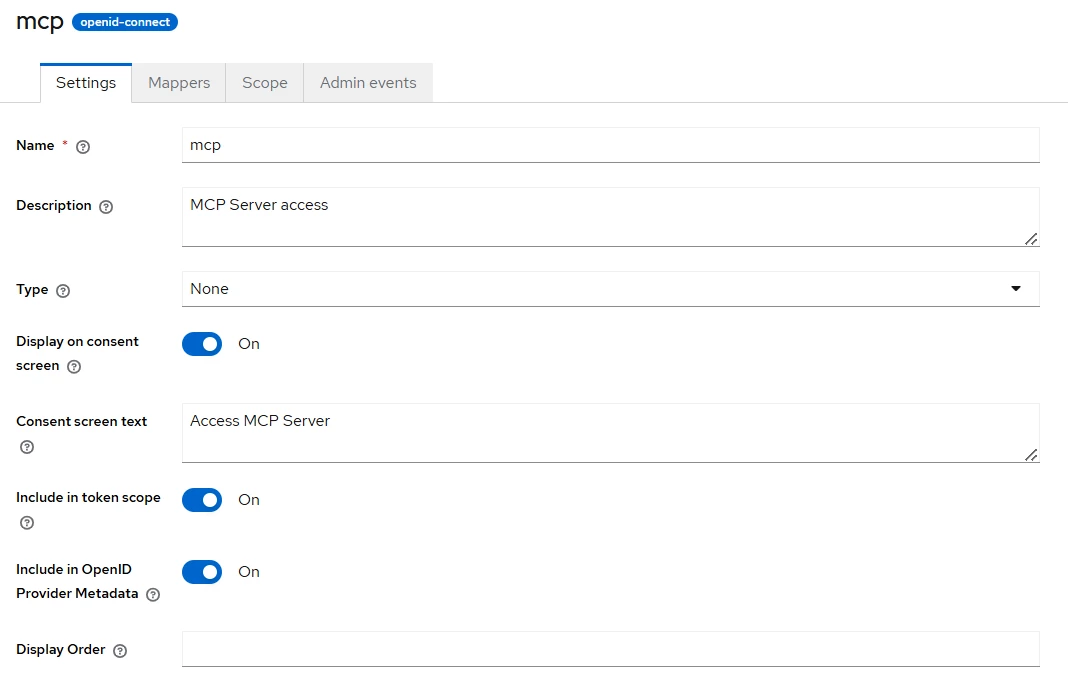
Configure:
| roperty | Value |
|---|---|
| Name | mcp |
| Description | MCP Server access |
| Type | None |
| Protocol | OpenID Connect |
| Include in token scope | On |
| Display on consent screen | On |
| Consent screen text | Access MDM MCP Server |
Save the client scope.
Screenshot 1: MCP client scope settings in Keycloak.
2.2. Configure the audience mapper
Navigate to Client scopes → mcp → Mappers → Configure a new mapper → Audience.
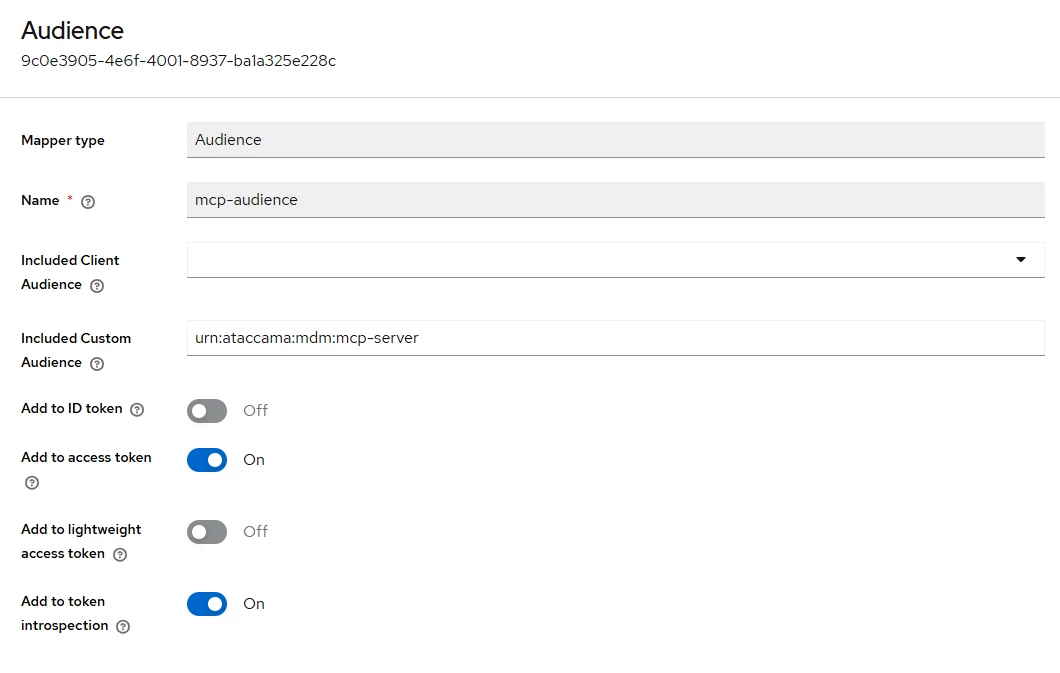
Configure:
| Property | Value |
|---|---|
| Name | mcp-audience |
| Included Client Audience | Leave empty |
| Included Custom Audience | urn:ataccama:mdm:mcp-server |
| Add to ID token | Off |
| Add to access token | On |
Save the mapper.
The audience value must match the audience configured in the MDM Server application properties.
Screenshot 2: Audience mapper configuration.
2.3. Register the OAuth client
Navigate to Clients → Create client.
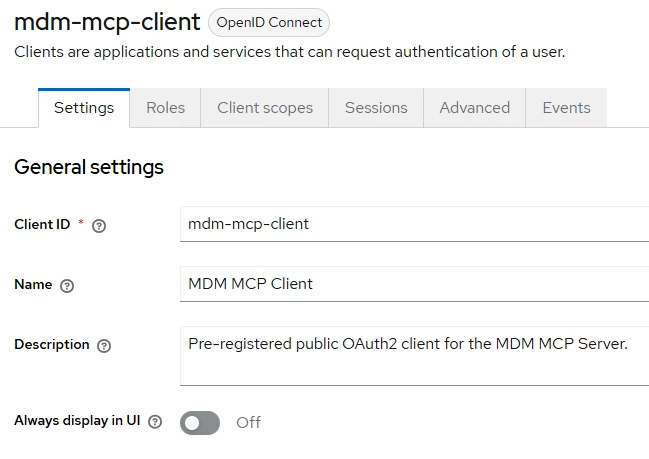
Create an OpenID Connect client with the following settings:
| Property | Value |
|---|---|
| Client type | OpenID Connect |
| Client ID | mdm-mcp-client |
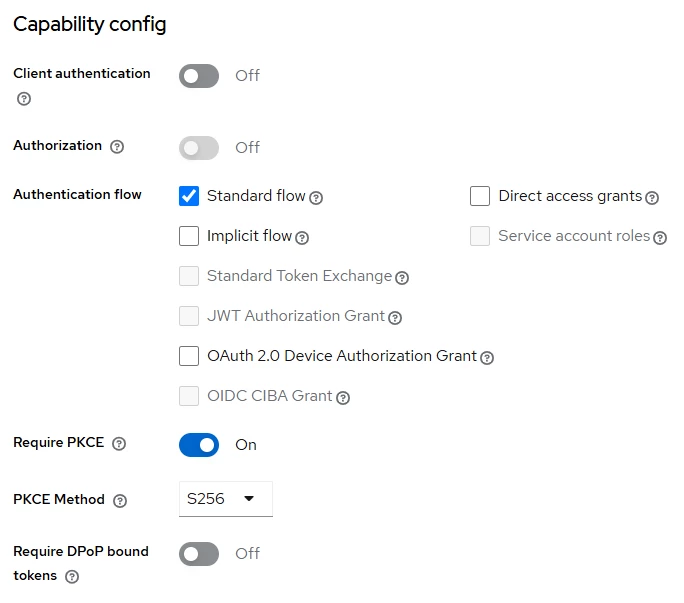
| Client authentication | Off |
| Standard flow | On |
| Direct access grants | Off |
| Implicit flow | Off |
| Require PKCE | On |
| PKCE Method | S256 |
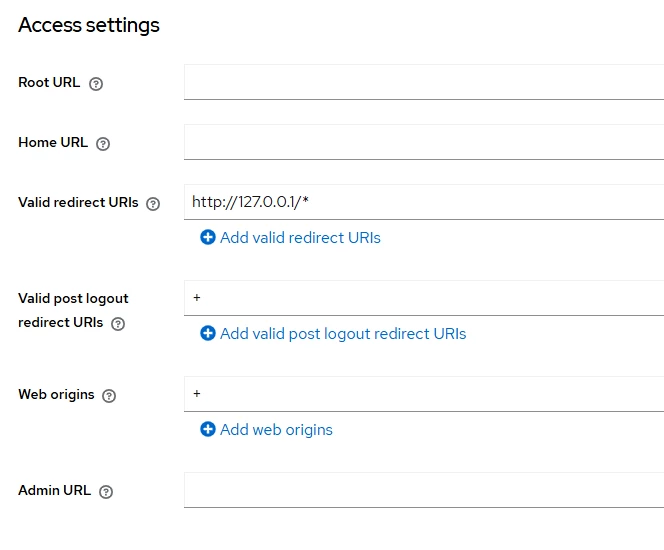
Configure the redirect settings:
| Property | Value |
|---|---|
| Valid redirect URIs | http://127.0.0.1/* |
| Valid post logout redirect URIs | + |
| Web origins | + |
Save the client.
Screenshot 3: OAuth client capability configuration with PKCE S256.
| 
| 
|
2.4. Assign the MCP client scope
Navigate to Clients → mdm-mcp-client → Client scopes.
-
Select Add client scope.
-
Choose
mcp. -
Assign it as Default.
This ensures the required MCP scope and audience are included in access tokens.
3. Enable the MDM MCP Server
Open the MDM Server application.properties file.
Add the following configuration:
# Enable MDM MCP Server
ataccama.one.mdm.mcp.server.enabled=true

# OAuth issuer
ataccama.one.mdm.mcp.server.issuer-uri=${spring.security.oauth2.resourceserver.jwt.issuer-uri}

# Required audience
ataccama.one.mdm.mcp.server.audience=urn:ataccama:mdm:mcp-server

# MCP Server configuration
spring.ai.mcp.server.name=mdm-mcp
spring.ai.mcp.server.streamable-http.mcp-endpoint=/mcp
Ensure that the MDM Server configuration contains the appropriate HTTP port and Keycloak settings.
For the local environment:
server.port=8051

ataccama.authentication.keycloak.realm=ataccamaone
ataccama.authentication.keycloak.base-url=http://localhost:8083
The effective JWT issuer must match the issuer advertised by Keycloak.
Save the configuration and restart MDM Server.
Screenshot 4: MCP Server configuration in application.properties.

4. Verify the MCP Server
Before connecting Claude Desktop, verify that the MCP endpoint and OAuth discovery endpoints are accessible.
4.1. Verify the MCP endpoint
Open Windows Command Prompt and execute:
curl.exe -i http://localhost:8051/mcpExpected response:
HTTP/1.1 401
WWW-Authenticate: Bearer resource_metadata="http://localhost:8051/.well-known/oauth-protected-resource"
The 401 Unauthorized response is expected for a request without an access token.
The WWW-Authenticate header indicates the OAuth metadata endpoint.
4.2. Verify OAuth Protected Resource Metadata
Execute:
The 401 Unauthorized response is expected for a request without an access token.
The WWW-Authenticate header indicates the OAuth metadata endpoint.
4.2. Verify OAuth Protected Resource Metadata
Execute:
{
  "authorization_servers": [
    "http://localhost:8083/auth/realms/ataccamaone"
  ],
  "scopes_supported": [
    "mcp"
  ]
}
The example shows the relevant properties only.
4.3. Verify Keycloak OpenID Configuration
Execute:
curl.exe -s http://localhost:8083/auth/realms/ataccamaone/.well-known/openid-configurationVerify that the response contains:
-
issuer -
authorization_endpoint -
token_endpoint -
code_challenge_methods_supported, includingS256
These checks confirm that the server and OAuth discovery endpoints are available.
5. Install Node.js
Claude Desktop will use mcp-remote to connect to the MDM MCP Server.
Download the Node.js LTS Windows installer from:
https://nodejs.org/en/download
During installation, enable:
-
Node.js runtime
-
npm package manager
-
Add to PATH
After installation, open a new Windows Command Prompt and execute:
node --version
npm --version
npx --version
Verify that all three commands return version numbers.
The tested configuration used Node.js 24.21.0 and mcp-remote version 0.14.3.
Step 2. Open Claude Desktop MCP configuration
Install and sign in to Claude Desktop.
Navigate to:
Settings → Developer → Local MCP servers → Edit config
Open claude_desktop_config.json.
Create a backup before making changes.
Step 3. Configure the MCP connection
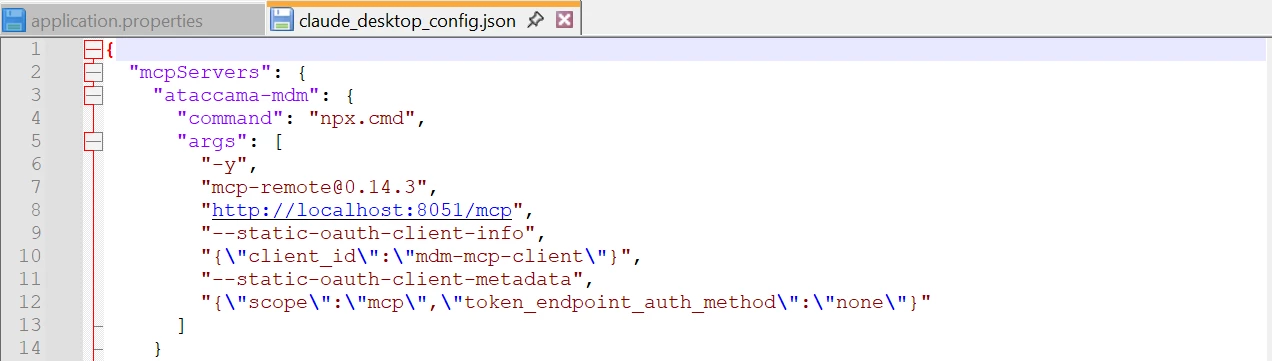
Add the following mcpServers property to the existing JSON configuration:
{
  "mcpServers": {
    "ataccama-mdm": {
      "command": "npx.cmd",
      "args": [
        "-y",
        "mcp-remote@0.14.3",
        "http://localhost:8051/mcp",
        "--static-oauth-client-info",
        "{\"client_id\":\"mdm-mcp-client\"}",
        "--static-oauth-client-metadata",
        "{\"scope\":\"mcp\",\"token_endpoint_auth_method\":\"none\"}"
      ]
    }
  }
}
If the configuration already contains other properties, preserve them and add mcpServers as a top-level property in the existing JSON object.
The configuration uses:
| Parameter | Purpose |
|---|---|
npx.cmd | Launches the MCP adapter on Windows |
mcp-remote@0.14.3 | Connects the local STDIO client to the HTTP MCP Server |
http://localhost:8051/mcp | MDM MCP endpoint |
mdm-mcp-client | Pre-registered OAuth client |
scope: mcp | OAuth scope |
token_endpoint_auth_method: none | Public OAuth client without a client secret |
The npx.cmd executable must be accessible through the PATH used by Claude Desktop.
Save the configuration.
Screenshot 5: Claude Desktop MCP configuration.
Step 4. Restart Claude Desktop
Completely quit Claude Desktop and start it again.
Complete OAuth authentication through Keycloak if prompted.
Navigate to:
Settings → Developer → Local MCP servers
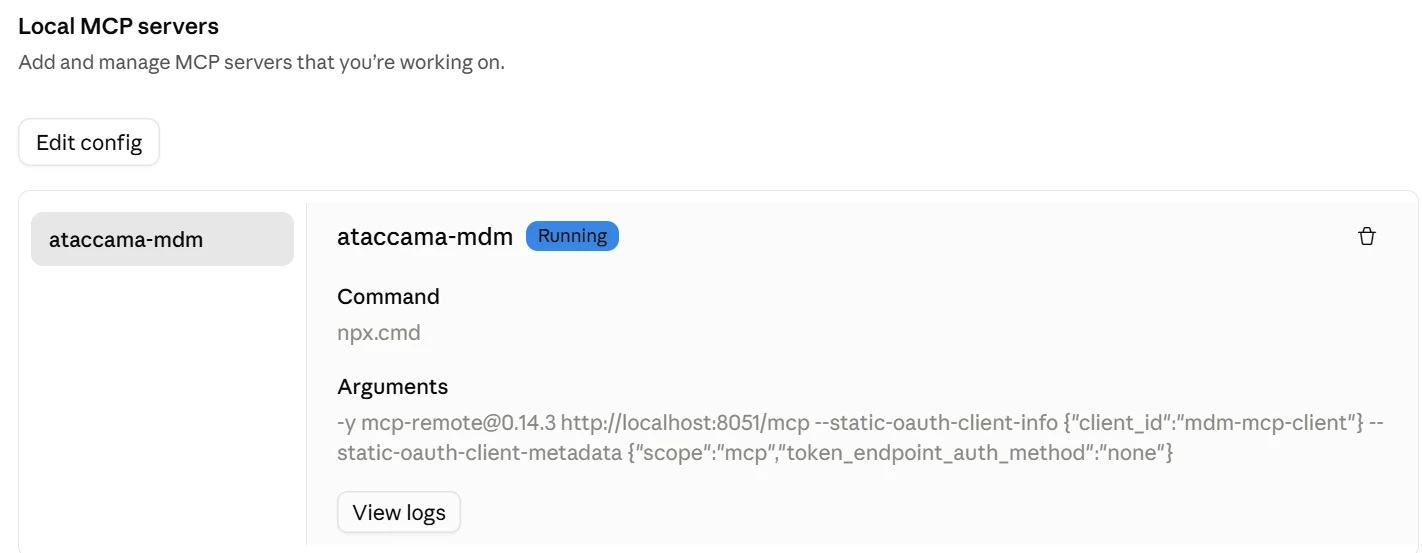
Verify that the server appears with the following status:
ataccama-mdm — Running
Screenshot 6: Local MCP server running in Claude Desktop.
6. Test the MCP Connection
Open a new Claude conversation.
Use a known Master-record ID from your development or test environment.
Example:
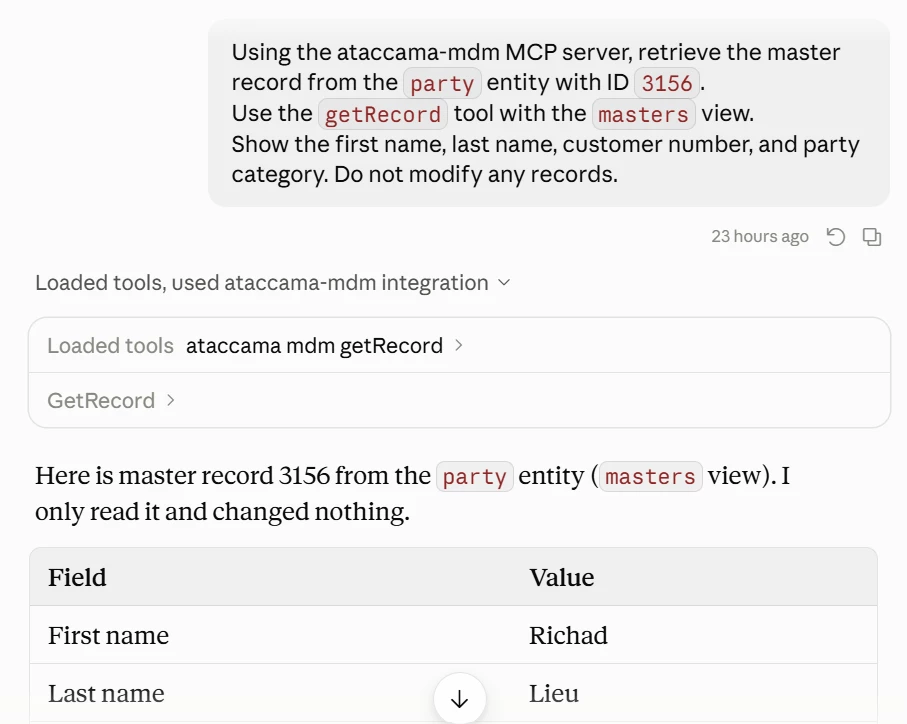
Using the ataccama-mdm MCP server, retrieve the master record from the party entity with ID 3156.
Use the getRecord tool with the masters view.
Show the first name, last name, customer number, and party category.
Do not modify any records.
For Claude Code, use the registered server name mdm-mcp instead of ataccama-mdm.
In the tested local environment, the request returned:
| Field | Value |
|---|---|
| First name | Richard |
| Last name | Lieu |
| Customer number | 950000006 |
| Party category | CONSUMER |
For other environments, replace the record ID with a known Master-record ID.
A successful response confirms that Claude can authenticate, invoke the MDM MCP tools, and retrieve MDM data.
Screenshot 7: Claude retrieving a Master-record through MCP.
7. Additional MCP Queries
Once the connection is established, the following read-only queries can be used to explore MDM functionality.
Explore Master Entities
List all available Master entities in Ataccama MDM and explain their purpose based on the available metadata.
Find Customer Records
Find Master records in the party entity where the first name is Richard. Return the record IDs, names, and customer numbers. Do not modify any records.
Compare Instance and Master Values
Retrieve a Master record and its associated Instance records. Compare the available attributes and identify missing or inconsistent values. Do not assume the origin of Master values unless it can be verified.
Explore Relationships
Retrieve a party Master record and its related addresses, if those relationships are available through MCP.
Review Stewardship Tasks
Retrieve available MDM Data Stewardship tasks and summarize their statuses. Do not approve or modify any tasks.
The available operations depend on the MCP tools exposed by the server, the user's permissions, and the configured MDM model.
8. Final Verification Checklist
The setup is complete when all applicable checks pass:
-
Keycloak MCP client scope is configured.
-
Audience mapper is configured.
-
OAuth client uses PKCE S256.
-
mcpscope is assigned as Default. -
MCP Server is enabled in
application.properties. -
MDM Server starts successfully.
-
MCP endpoint returns an OAuth authentication challenge.
-
OAuth metadata is accessible.
-
Claude Code or Claude Desktop is configured.
-
OAuth authorization completes successfully.
-
Claude retrieves an MDM record through an MCP tool.
References
Ataccama documentation
Client tools
Version information: Ataccama MDM 17.1.0. MCP Server is an experimental feature. The Claude Desktop configuration using mcp-remote@0.14.3 was validated in a local Windows environment.
Troubleshooting MCP Connection Issues>>
Troubleshooting MCP Connection Issues
If the Ataccama MDM MCP server does not connect to Claude Desktop, or the connection stops working after previously succeeding, follow the troubleshooting steps below.
1. Check the MCP Server Status
-
Open Claude Desktop → Settings → Developer.
-
Locate the
ataccama-mdmserver. -
Check whether its status is Running.
-
If the server is not running, click View logs to inspect the error messages.
A Running status confirms that the MCP process has started, but it does not necessarily mean that authentication and MCP tool execution are working correctly.
2. Check for Command Execution Errors
If the logs contain:
'C:\Program' is not recognized as an internal or external commandWindows is attempting to execute a path containing spaces without handling the quotation marks correctly.
Verify the command and arguments in the Claude Desktop MCP configuration.
Make sure that npx.cmd can be found through the system PATH and that paths containing spaces are handled correctly.
3. Resolve OAuth Authentication Conflicts
If the logs contain messages such as:
Another instance is running the sign-in for this server on port 43411or:
Another instance completed the sign-in,
but the remote server refused the tokens it wrote
Multiple MCP proxy processes may be competing to handle OAuth authentication.
Step 1 — Close Claude Desktop
Completely exit Claude Desktop, including any background processes.
Step 2 — Identify the process using the OAuth callback port
Open Windows Command Prompt (CMD) and run:
netstat -ano | findstr :43411The port 43411 is an example from the MCP configuration used here. Check the MCP logs for the actual OAuth callback port if it differs.
If a process is listening on the port, the output will contain a line similar to:
TCP 127.0.0.1:43411 0.0.0.0:0 LISTENING 29136The final number is the process ID (PID).
Step 3 — Identify the process
Replace 29136 with the PID returned by the previous command:
tasklist /FI "PID eq 29136"If the process is node.exe, inspect its command line to confirm that it belongs to mcp-remote:
powershell -NoProfile -Command "Get-CimInstance Win32_Process -Filter 'ProcessId=29136' | Select-Object -ExpandProperty CommandLine"Look for mcp-remote and the MCP endpoint, such as:
http://localhost:8051/mcpStep 4 — Stop the stale MCP proxy process
Only if the process has been confirmed as the obsolete mcp-remote process, terminate it:
taskkill /PID 29136 /FVerify that the callback port is no longer in the LISTENING state:
netstat -ano | findstr :43411Entries such as TIME_WAIT may still appear temporarily and do not necessarily indicate that the port is occupied by a listening process.
Step 5 — Check for remaining MCP proxy processes
Run:
powershell -NoProfile -Command "Get-CimInstance Win32_Process | Where-Object { $_.Name -eq 'node.exe' -and $_.CommandLine -like '*mcp-remote*' } | Select-Object ProcessId,CommandLine"Review any remaining processes before terminating them. Avoid stopping unrelated Node.js applications.
4. Restart Claude Desktop and Complete OAuth Authorization
-
Start Claude Desktop.
-
Wait for the OAuth authentication window to open.
-
Sign in through the configured Ataccama Keycloak authorization server.
-
Complete the authorization flow.
When successful, the browser displays:
Authorization successful!
You may close this window and return to the CLI.
Close the browser tab and return to Claude Desktop.
Navigate to Settings → Developer and confirm that ataccama-mdm displays Running.
If authentication continues to fail, inspect the latest MCP logs for token-refresh errors, Unauthorized responses, and conflicting authentication sessions.
5. Verify Actual MCP Tool Execution
A successful OAuth callback and a Running server status do not guarantee that MCP tools can execute.
Open a new Claude Desktop conversation and enter:
Using the ataccama-mdm MCP server, list the available
MDM entities. Execute the relevant MCP tool and show
the actual results returned by the server.
Do not generate sample data.
Verify that Claude invokes an MCP tool and returns information from the connected MDM environment.
If the request fails, inspect the latest logs for errors such as:
UnauthorizedError: Unauthorizedor:
UND_ERR_HEADERS_TIMEOUTThese errors should be investigated separately: an authorization failure does not necessarily have the same cause as a server response timeout.
Note: If the MCP connection repeatedly fails after completing these steps, review the OAuth client configuration, token-refresh behaviour, and server-side logs before changing or deleting stored credentials.