


📌 Links to the legacy documentation portal are no longer available. Read about the changes and how to access our documentation here.
Hi everyone, happy Monday!
In this post, I’ll walk you through best practices for utilizing Post Processing Plans. After executing data quality (DQ) evaluations, the results are transferred to ONE Desktop.
In the world of data management, the journey doesn't end with data quality evaluations. Once your data has undergone scrutiny and validation, the real magic happens in the post-processing phase. This is where you mold your data into the desired form, perform intelligent actions, and orchestrate its path to its next destination.
What are Post Processing Plans?
In the realm of Ataccama's ONE Desktop, post-processing plans are the key to unlocking the full potential of your data. These plans serve as bridges that connect the results of data quality evaluations with a world of endless possibilities. They allow you to decide what to do with the data next, whether it's isolating the problematic records, assigning tasks, sending out notifications, or exporting to an external database or custom business intelligence tool.
Here's a glimpse of what's achievable:
Implementation Ideas
- Data Quality Issue Tracking (DQIT): Route only the records with issues to your DQIT system for in-depth analysis and resolution.
- Business Intelligence Integration: Use the results of your data quality evaluations as a source for your business intelligence tools, enabling you to make informed decisions.
But there's more to it. To make your post-processing plans work seamlessly, you must pay attention to the finer details.
Navigating the Landscape of Implementation
When you've set your sights on using the "JDBC Writer" step in your post-processing plan, understanding the landscape is crucial. You can write your data, but there are rules:
-
Match the Data Source: Your destination depends on the data source of your catalog item in your monitoring project. For instance, if your catalog item resides in a PostgreSQL database, your post-processing plan will be limited to writing into PostgreSQL. It's a one-to-one relationship.
-
The Global Runtime Configuration: It's like the secret key to hidden treasures. When writing data during post-processing, your quest may lead you to data sources defined in the global runtime configuration. But beware of the prerequisites:
- The
<datasource>element in the global runtime configuration should include thedriverClassattribute, notdriverName. - The driver class must be within the DQC classpath.
- Post-processing components should reference the data source using the same
nameas specified in the runtime configuration.
- The
A Word of Caution: Naming Matters
In your quest for data glory, remember that using catalog item attribute names (column names) that duplicate system input names in a monitoring project can be treacherous. These forbidden names include "score," "valid_rules," "invalid_rules," and "invalid_rules_explanation." The consequence of this is a failing post-processing plan. But, fear not, for a simple renaming of column names in the source database can resolve this issue.
Walking the Path with an Example
Allow us to illustrate these best practices with a step-by-step example. We'll create a "Post Processing Plan" for exporting data using a simple table named "People Full Name" as our Catalog Item. We've got one "DQ Rule" and a "Monitoring Project" to guide us.
Let's Begin:
Prerequisites:
- Equip yourself with ONE Desktop. If you're not sure where to find it, check out Ataccama ONE Desktop for more details.
- Ensure you have a connection to the ONE Ataccama Platform Server. If you need guidance, refer to Creating a New Server Connection.
With these essentials at your disposal, let's proceed with the procedure:
Here's the Route:
- Open your trusty web browser.
- Navigate to the ONE Web Application.
- Explore the Data Quality tab.
- Find your way to the Rules section.
- Click "Create."
- Fill in the General Information with a Name ("Gender DQ Rule") and Description ("Gender DQ Rule").
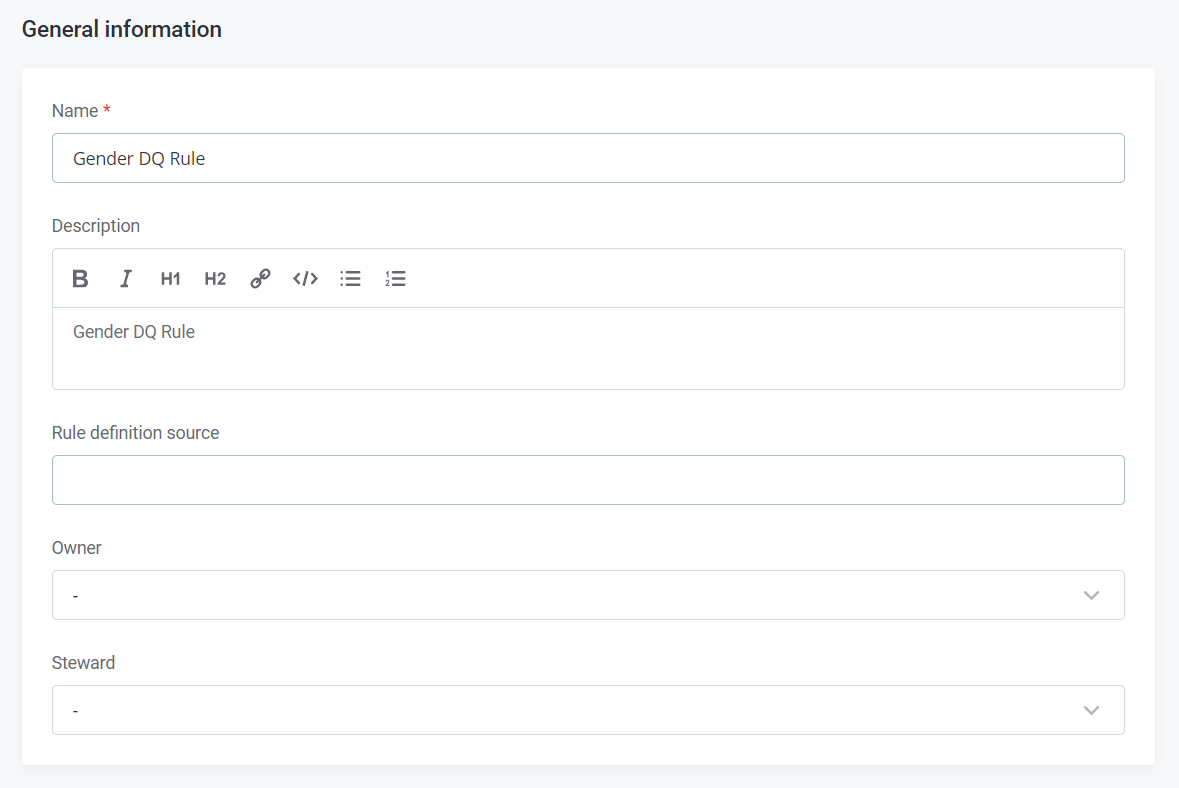
- Click "Save."
Diving into the Details:
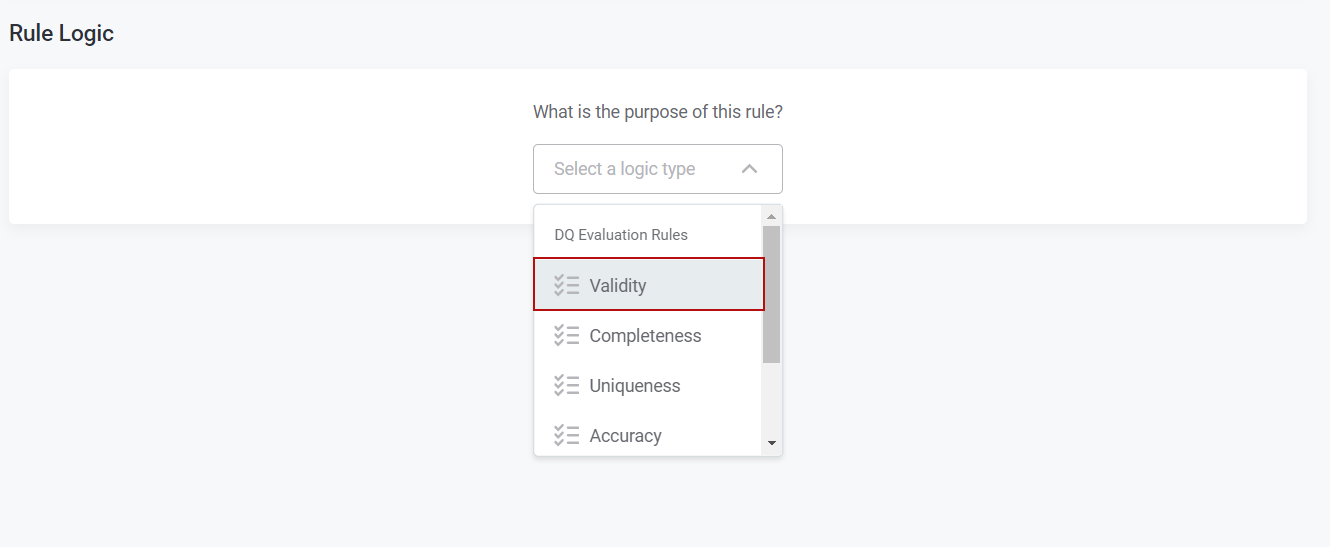
- In the Implementation tab, select the logic type as "Validity."
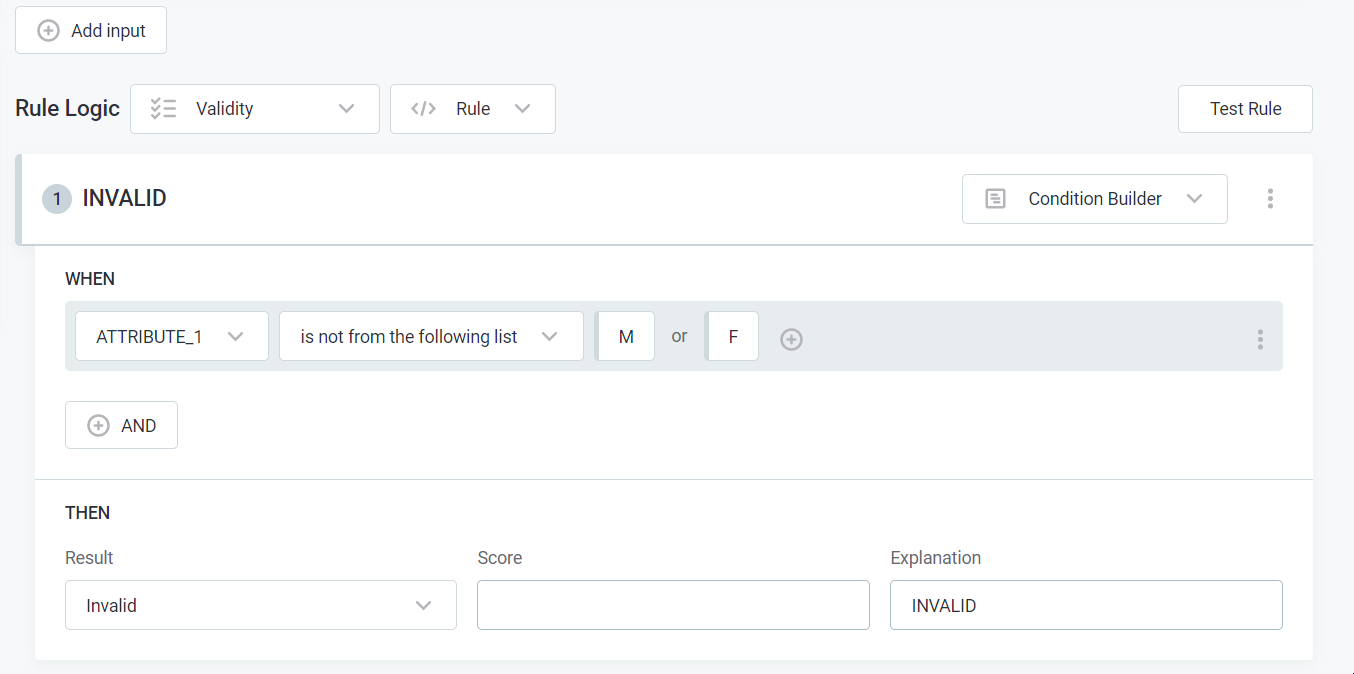
- Implement your Rule Logic to fit your requirements.
- Don't forget to hit "Publish."
Charting a New Course:
- Onward to the Monitoring Projects.
- Click "Create."
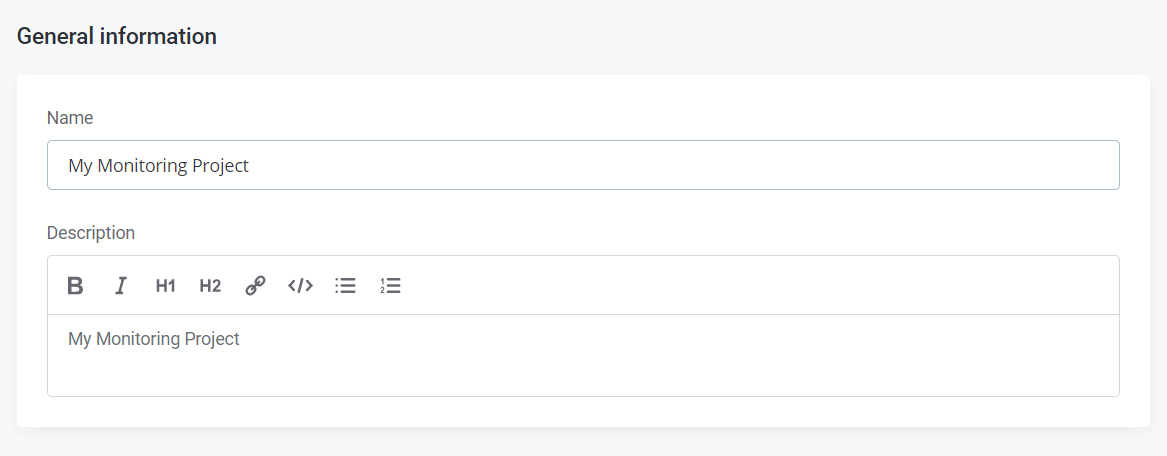
- This time, enter a Name ("My Monitoring Project") and Description ("My Monitoring Project").
- A quick "Save" seals the deal.
Bringing It All Together:
- Traverse to the Configuration & Results tab.
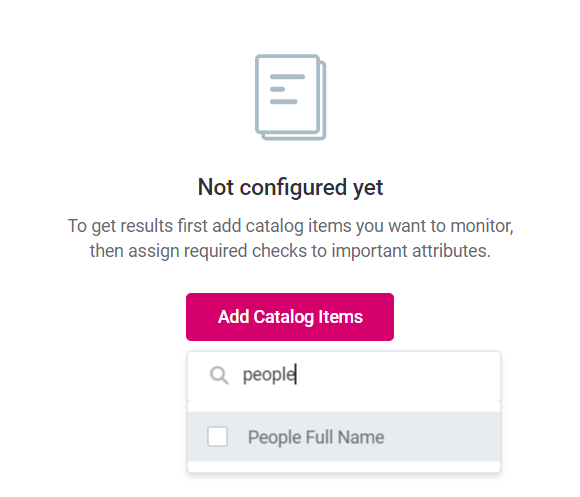
- Click "Add Catalog Items."
- Seek out your desired Catalog Item.
- Click on the added Catalog Item under "Items to Monitor."
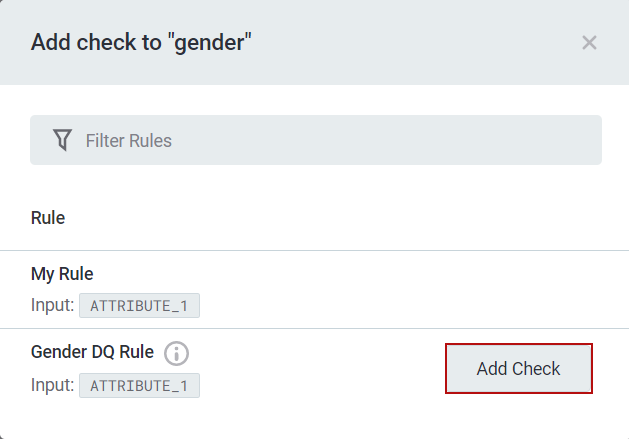
- Add the DQ Check for the columns of your choice by clicking the "+" sign under "Applied DQ Checks."
- Set your filter for the DQ Check and click "Add Check."
- Don't forget to "Publish" your changes.
Into the ONE Desktop:
- Open ONE Desktop, your gateway to the Ataccama ONE Platform.
- Connect to the Ataccama ONE Platform server.
- Seek out the Monitoring Projects section.
- Find and select your project ("My Monitoring Project").
- Right-click on your project.
- Venture into the unknown with "New" > "Post Processing Plan."
Creating the Post Processing Plan:
- In the "Create a new post-processing plan" dialog, give it a Name ("My Post Processing Plan").
- Specify the Catalog Item (Monitored Catalog Item).
- Define the Output Location ("export/${date}/${catalogItemName}/").
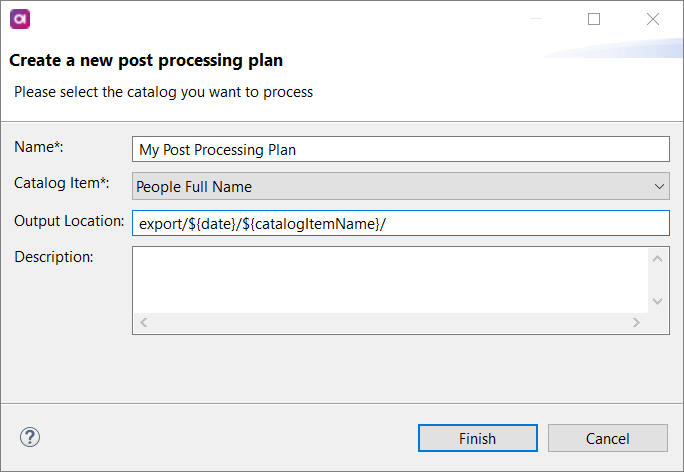
- It's time to "Finish."
Editing Components:
- Navigate to the Components section.
- Select your newly created component and right-click.
- Instead of the "Trash" step, replace it with the "Text File Writer" step.
- Configure the "Text File Writer" step as shown in the example. (Note: Using variables in the "File Name" is a no-go in post-processing plans.)
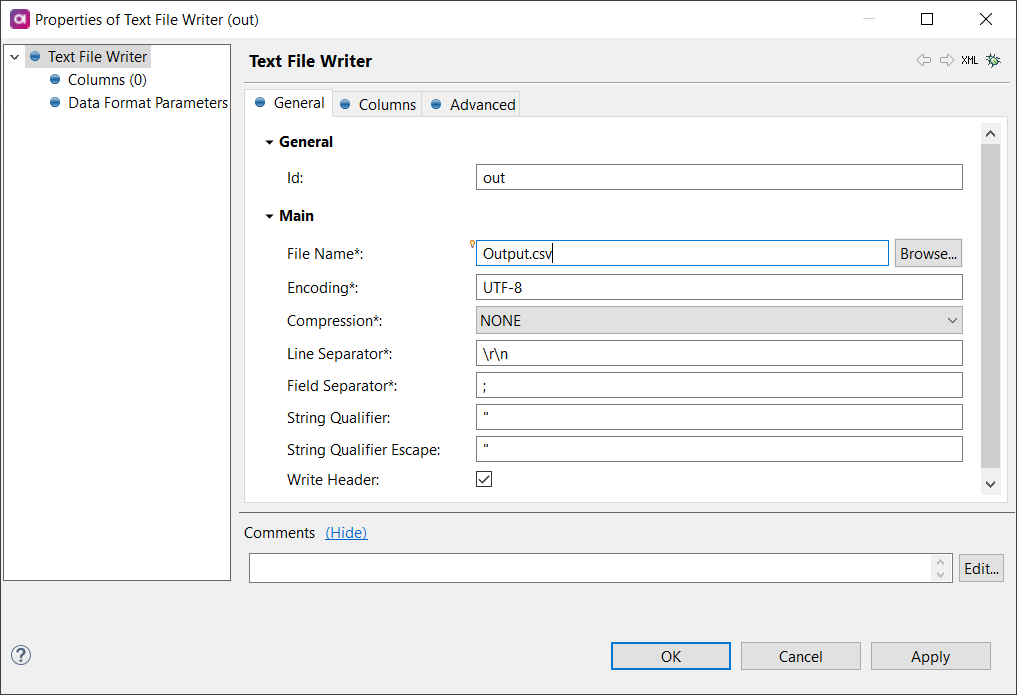
- Click "OK."
Ready to Unleash:
- Back to the Components section.
- Right-click on your component.
- Select "Publish."
- In the "Publish Component" dialog, change the State to "Implemented."
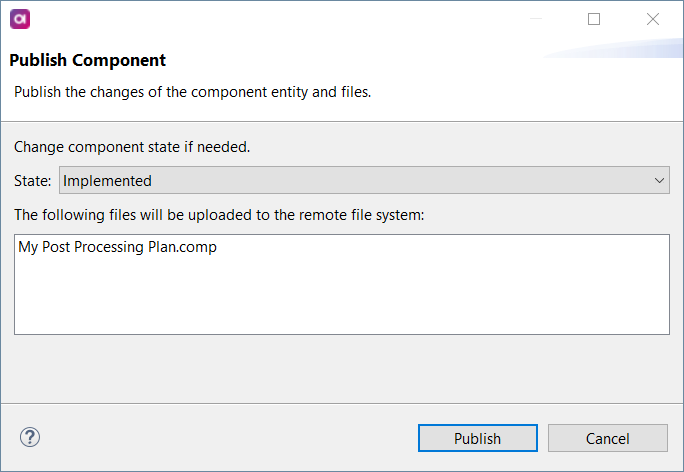
- Seal the deal with a final "Publish."
The Finish Line:
- Return to the ONE Web Application.
- In your monitoring project, trigger the "Run monitoring" command.
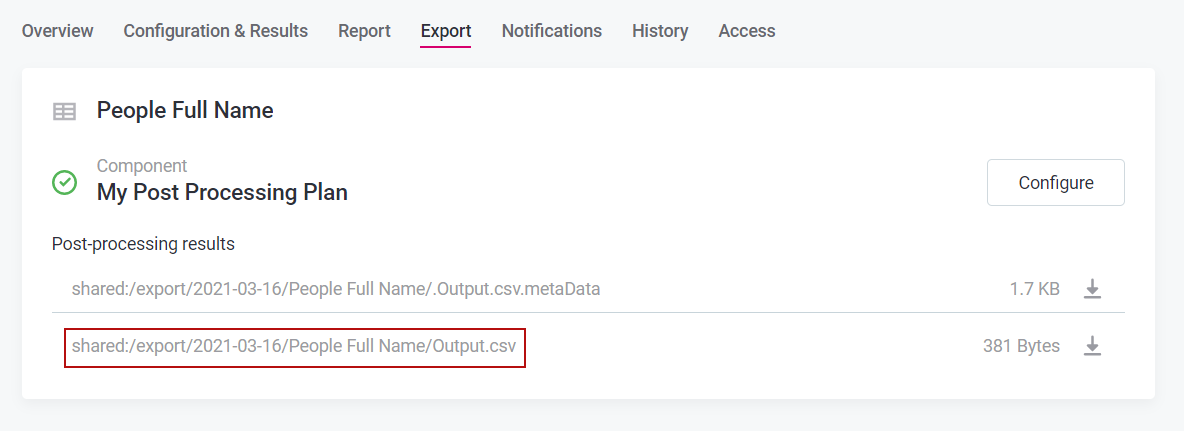
- Once completed, proceed to the "Export" tab.
- Download the exported report ("Output.csv").
The Result:
Behold, the fruits of your labor:
Output.csv:
"Full Name";"gender";"valid_rules";"invalid_rules";"invalid_rules_explanation" "John Smith";"M";"Gender DQ Rule-8618a95e-1059-437b-be20-c31cff2ccc2e";; "Jack Blacksmith";"M";"Gender DQ Rule-8618a95e-1059-437b-be20-c31cff2ccc2e";; "Peter Paul";"M";"Gender DQ Rule-8618a95e-1059-437b-be20-c31cff2ccc2e";; "Jane Jones";"F";"Gender DQ Rule-8618a95e-1059-437b-be20-c31cff2ccc2e";;
The insights from your monitoring project rule instances are now neatly arranged in post-processing plans, be it in the "valid_rules" or "invalid_rules" column. Whether a dimension contributes to overall data quality or not, it is readily accessible without impacting its presence in invalid samples.
Bonus Tip: In case you're wondering, "invalid_rules_explanation" exclusively holds the details of the failed results.
And that’s all! Let us know in the comments if you have any questions 👇🏻


