


Happy Wednesday community ☀️
Welcome back to our Data Quality series! In today's post, we'll delve deeper into configuring detection and validation rules in Ataccama ONE. If you missed our previous post, we recommend checking it out before continuing.
Configure Detection Logic
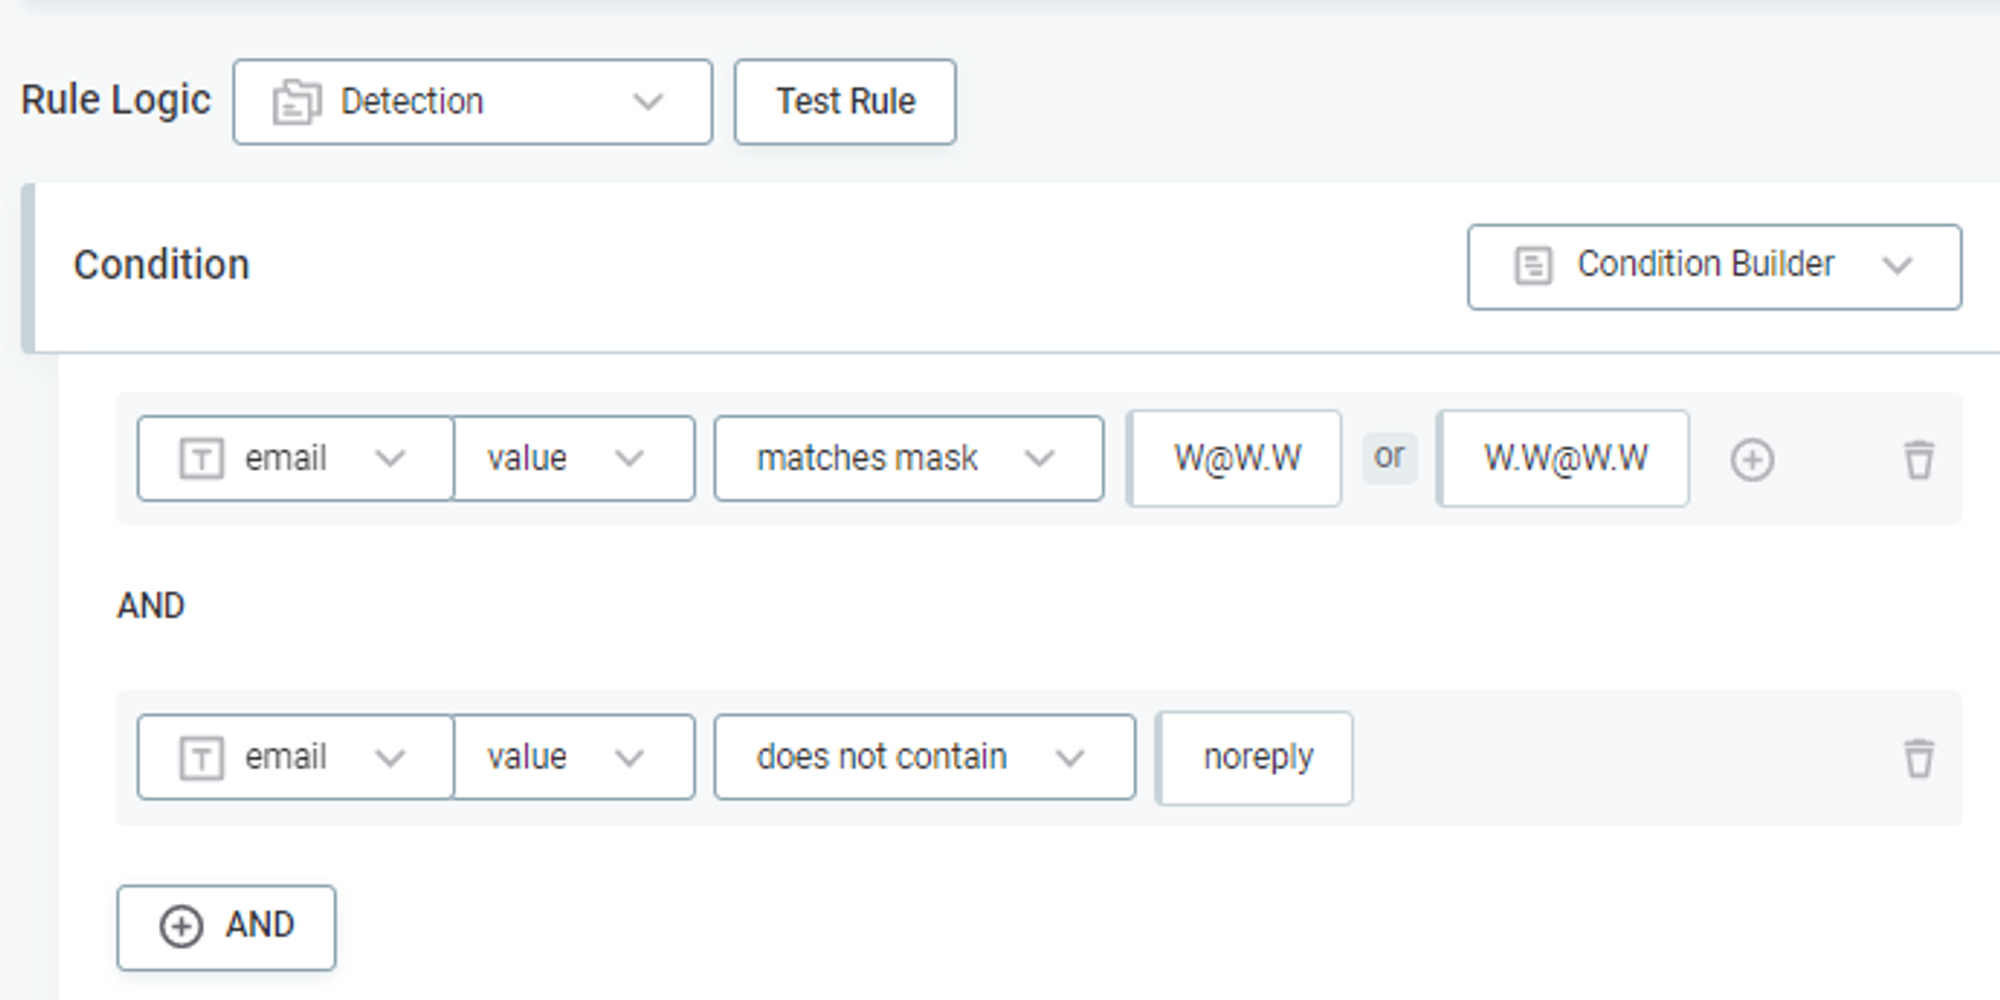
To define your detection rule's logic, navigate to the "Implementation" tab when creating or editing a rule. If you're starting from scratch, select "Detection" as the rule logic. You can add multiple conditions using the Condition Builder, with each record needing to fulfill all conditions by default (using the logical operator AND). For less strict rules with the logical operator OR, try the Advanced Expression mode. Take advantage of Pattern Analysis results to create detection rules quickly. For instance, open the "Profile & DQ Insights" tab for the catalog item "customers," select the "email" attribute, and utilize the detected patterns by choosing "Use results in rule." Save your changes and don't forget to test your rule before sharing it with others.
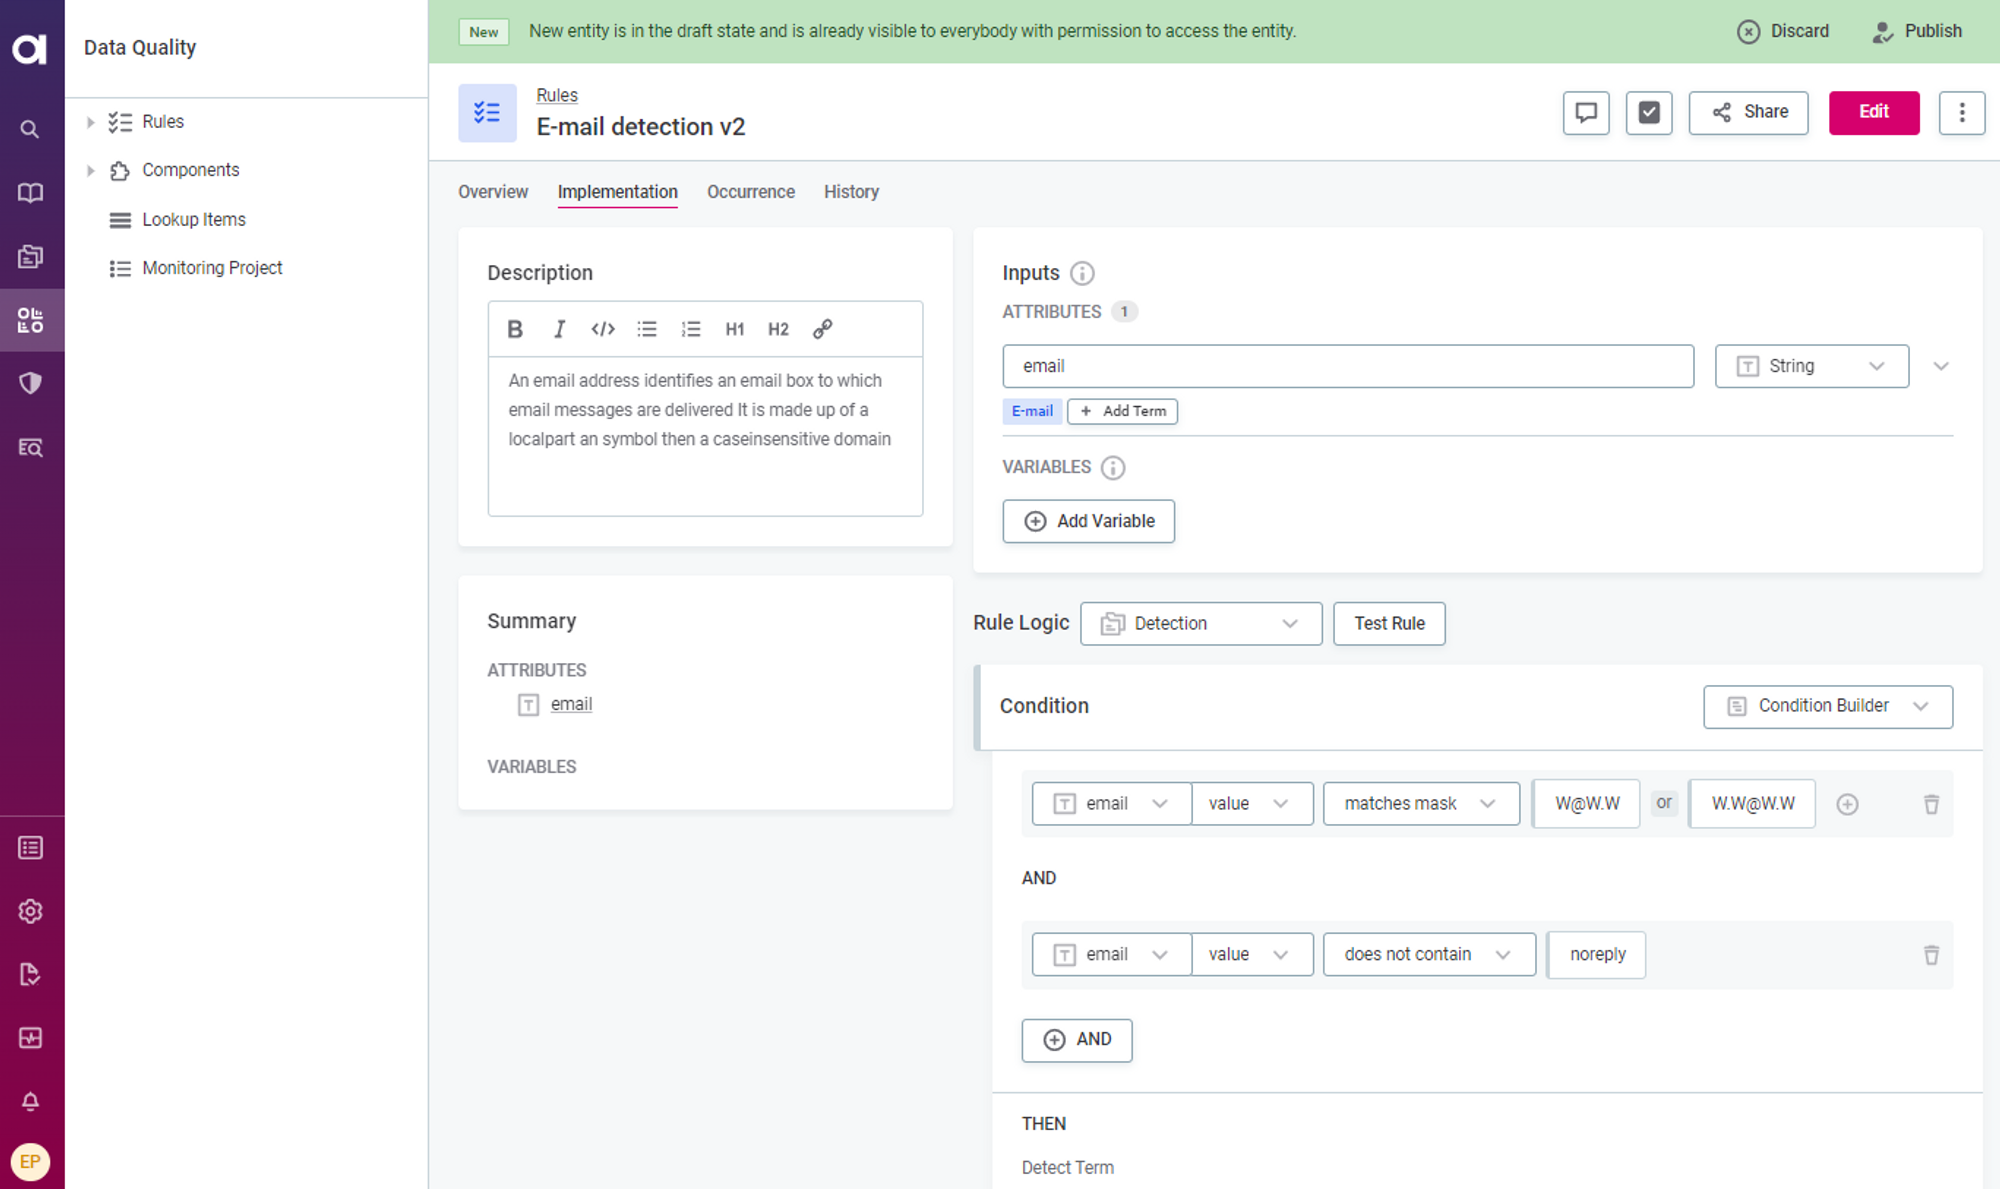
Test Detection Rule
Use the "Test Rule" function to verify the detection rule's effectiveness before making it available to other users. Ensure you test with both passing and failing values. When ready, publish the rule or submit it for publishing if you lack the necessary permissions. You can also share the rule with other users.
Map Detection Rule to Business Term
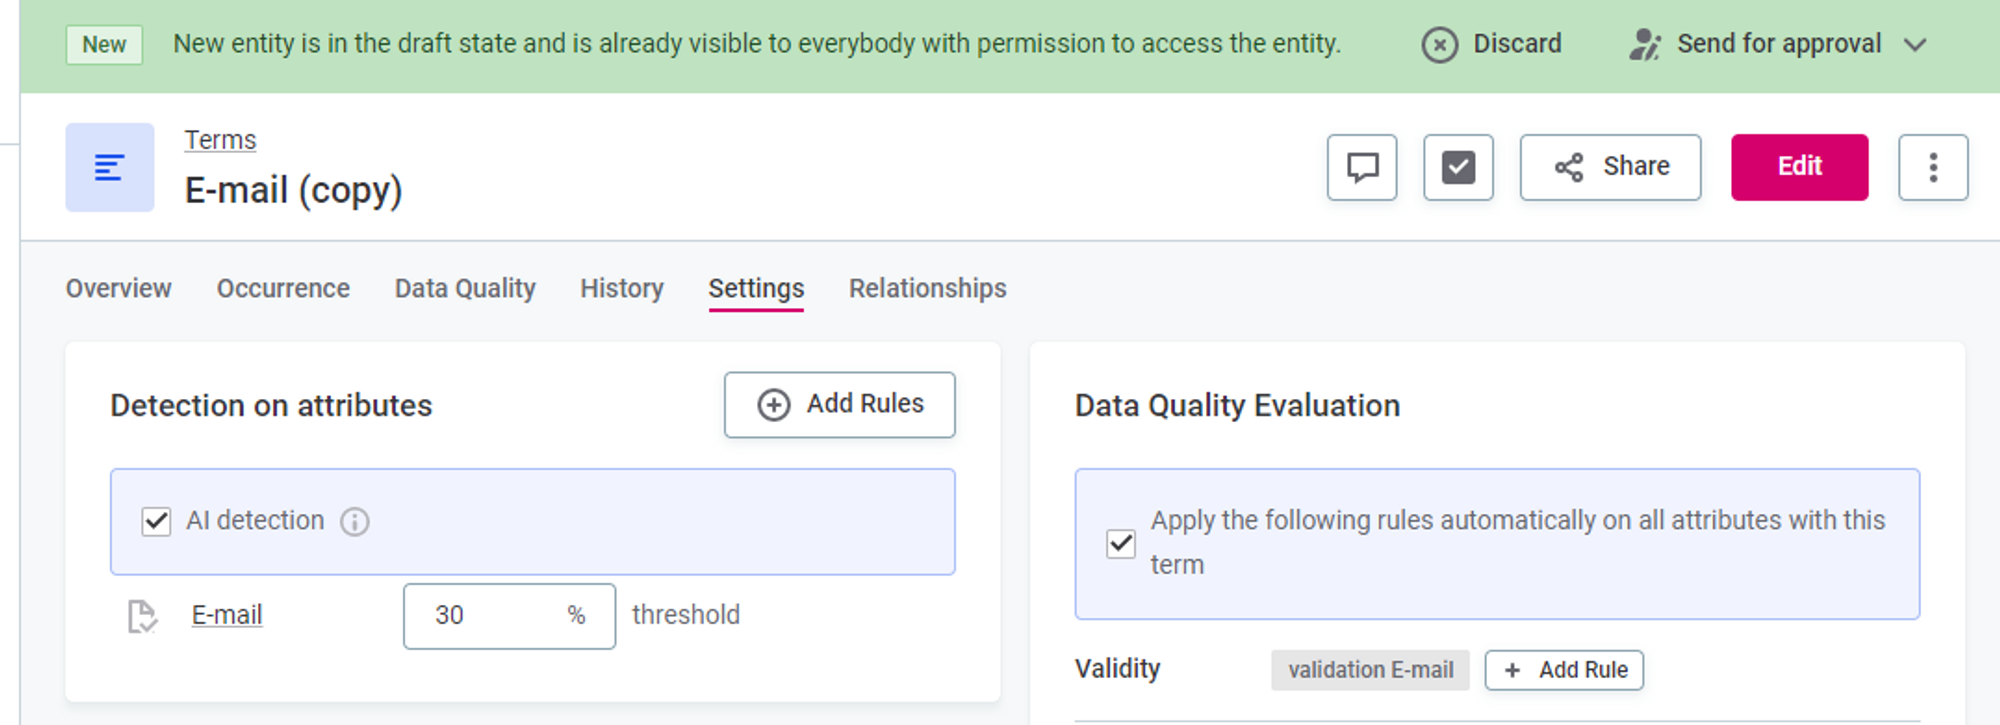
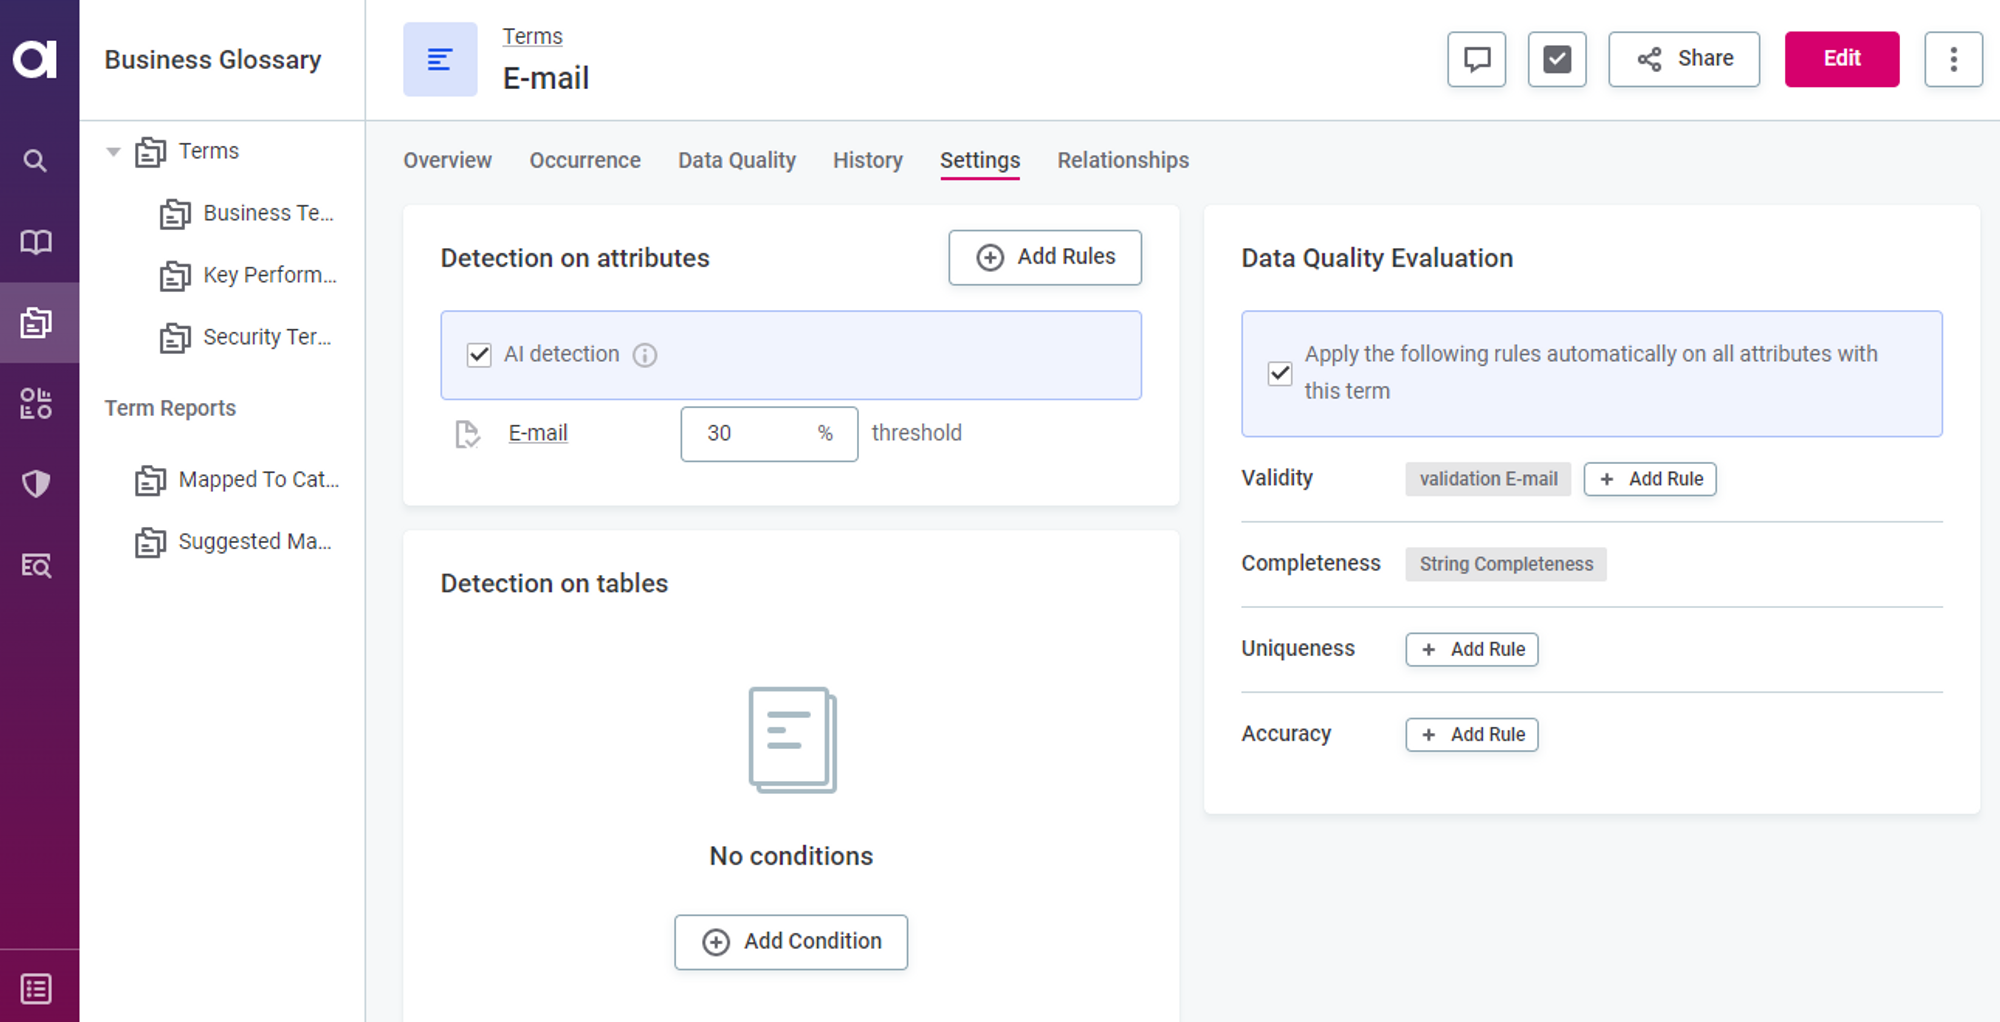
Once your detection rule is published, you can map it to a business term for automatic term detection. This ensures the term is assigned to matching attributes that meet the detection threshold. In the "Business Glossary," locate and open the relevant term. On the "Settings" tab, under "Detection on attributes," add the detection rule and specify the detection threshold. This threshold determines the percentage of attribute records that must pass the rule for the business term to be assigned. Save your changes and publish them for them to take effect.
Define Automated DQ Evaluation
Automated Data Quality (DQ) evaluation relies on business terms for data categorization. Mapping DQ rules to specific terms enables the validation of data. DQ evaluation primarily works with terms and rules. Each rule evaluates one DQ dimension, such as validity, accuracy, uniqueness, or completeness. One term can have multiple rules for each dimension. For example, when assessing the data quality of customer email addresses, you may want to check for empty values, validate email format, and identify duplicate emails. Each of these points would require a separate DQ rule.
Create a DQ Rule
To set up automated DQ evaluation, follow these steps:
- Create a rule, define the rule implementation logic (conditions), and test the rule.
- Map the rule to the term.
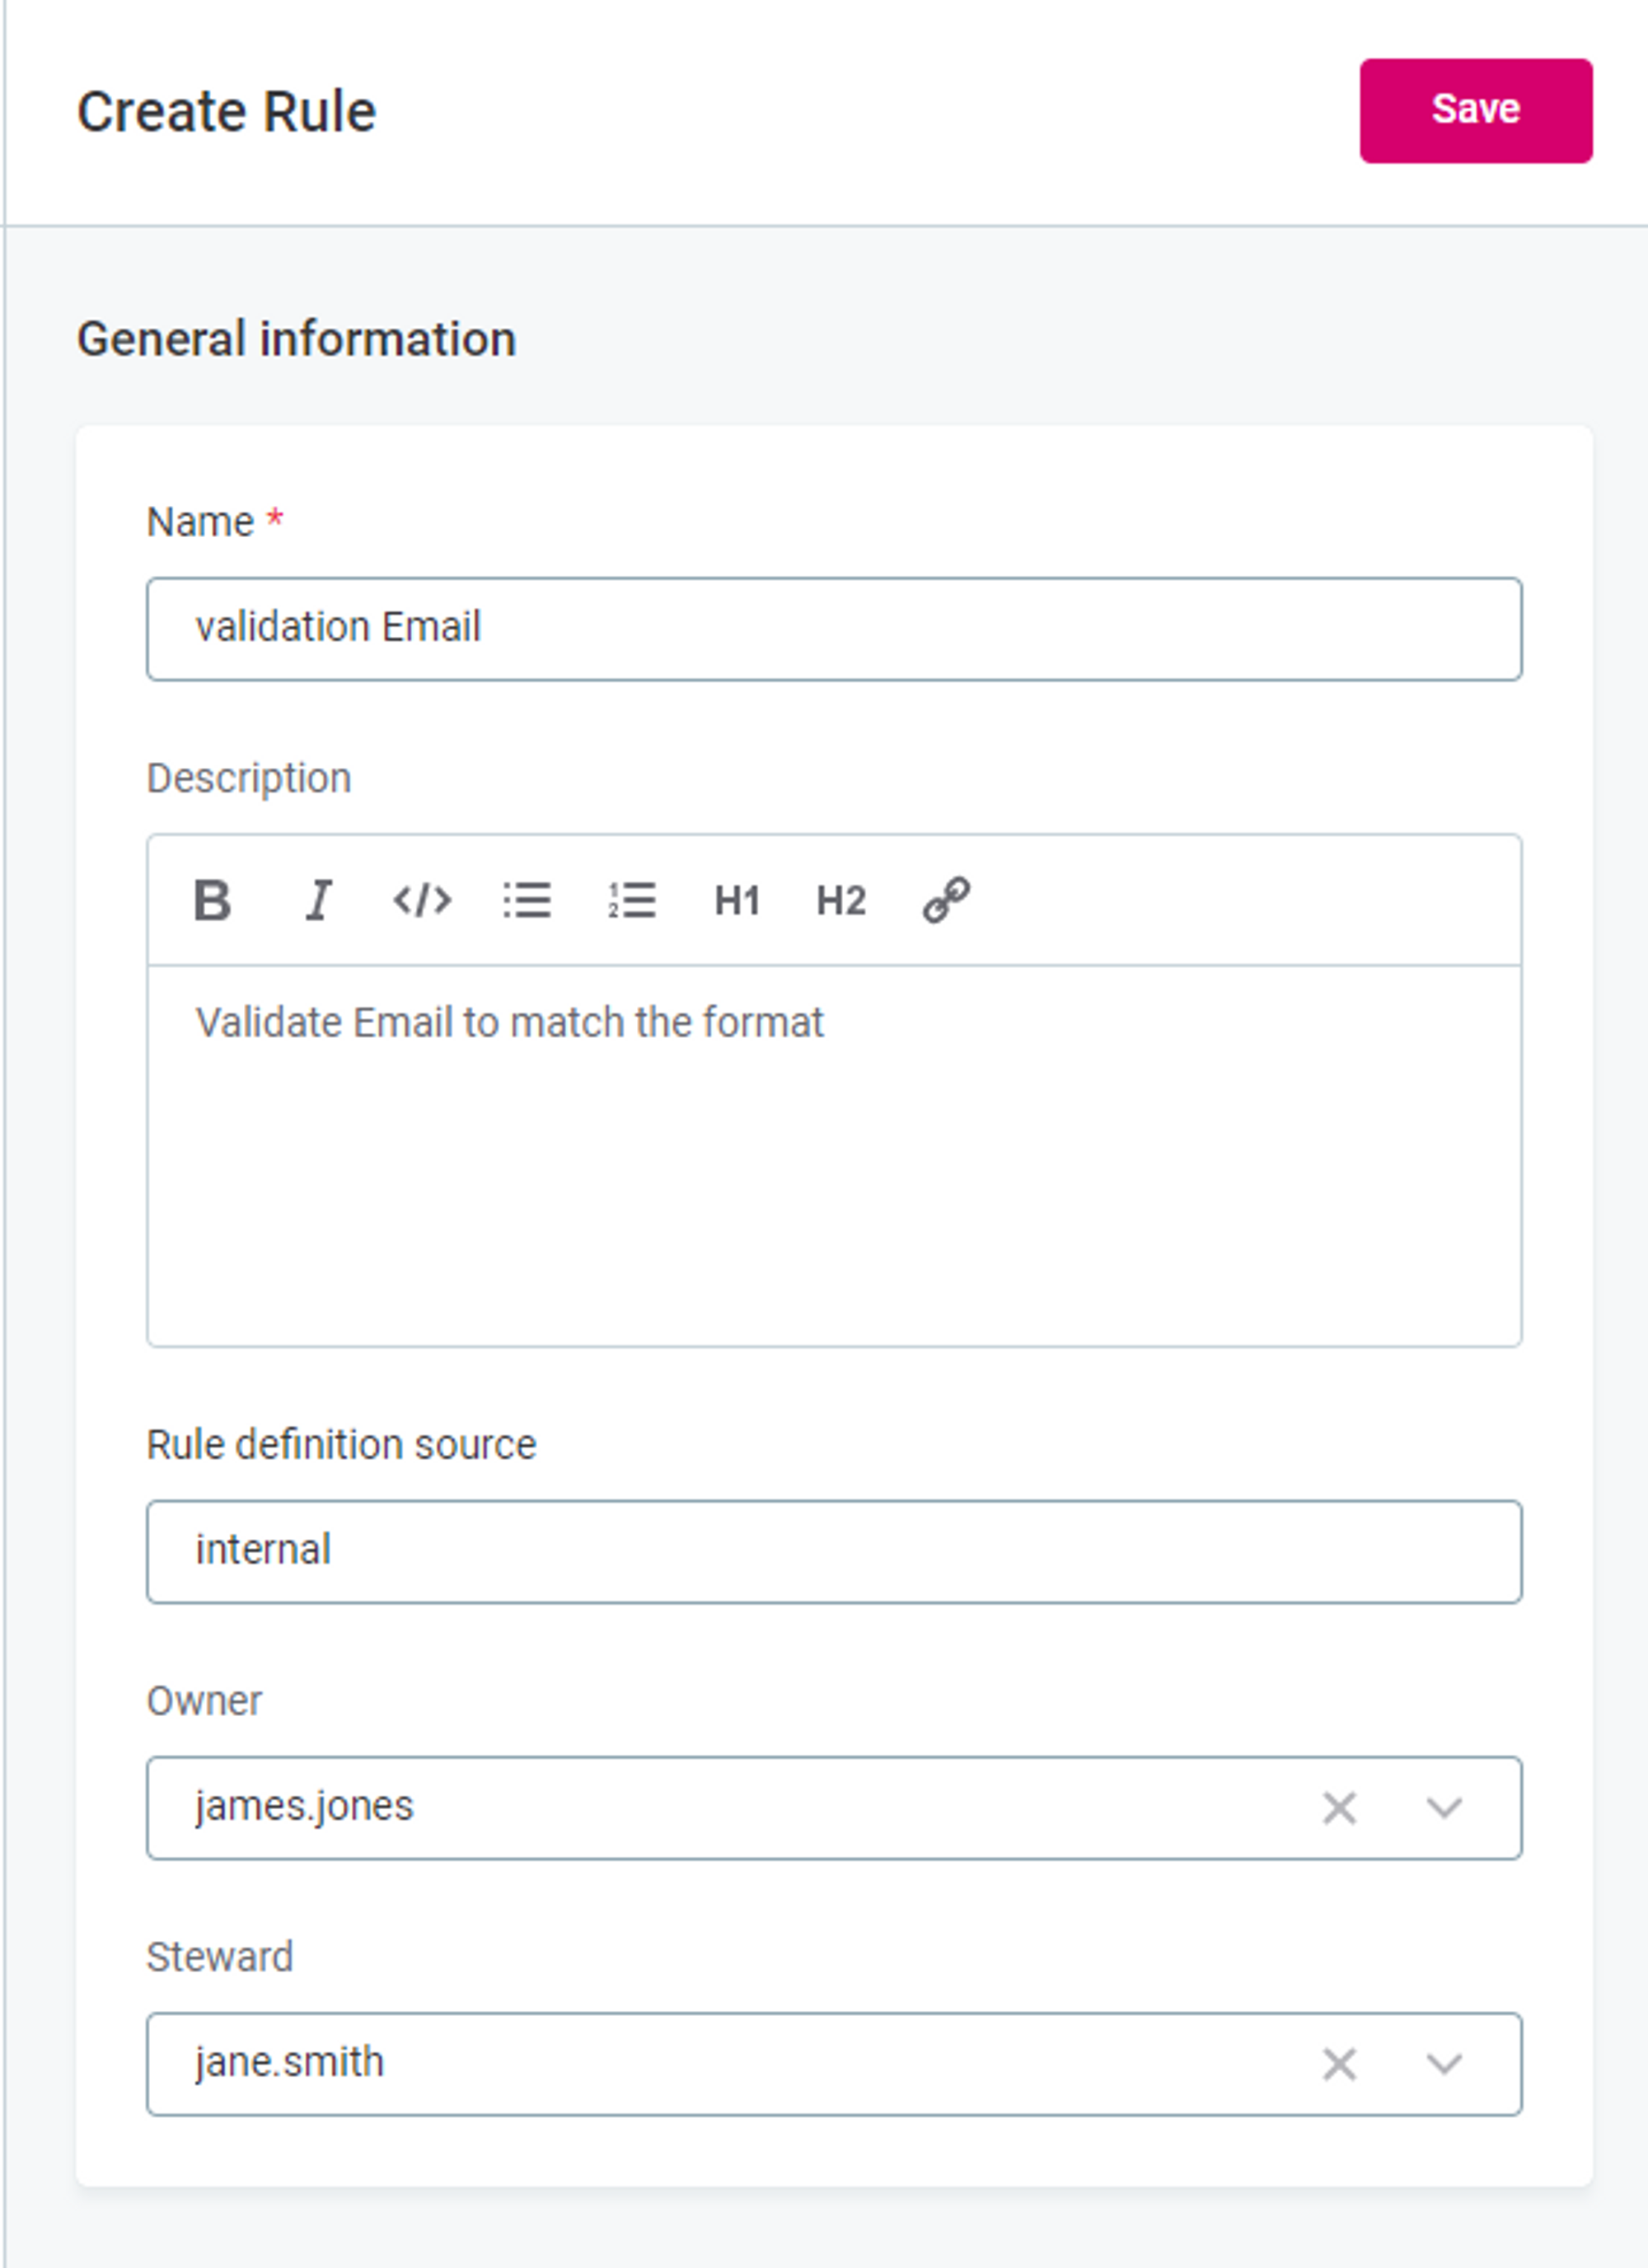
Creating DQ rules is similar to creating detection rules but often involves more complex implementation logic with multiple conditions. Start in the "Data Quality" section, click on the "Rules" tab, and select "Create." Provide a name, description, and owner for the rule. You can use an existing DQ rule as a template and modify it as needed.
Configure Validation Logic
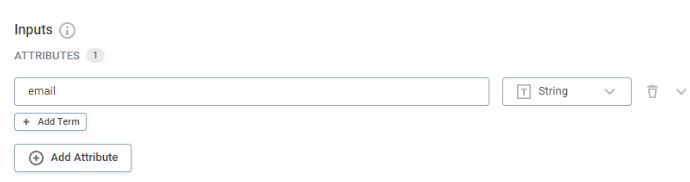
Configure or edit the rule's logic from the "Implementation" tab. Select the appropriate rule dimension as the "Rule Logic." Define inputs, variables, and conditions for the validation logic.
- Inputs: Define placeholders for input attributes. For domain-based validation, use a single input and rename it meaningfully.
- Variables: Store transformed input data if necessary.
- Conditions: Define validation logic using multiple conditions.
Specify meaningful rule results explanations for easy analysis. Consider exploring the "Advanced Expression" mode for more advanced configurations.
Test DQ Rule
Before making the DQ rule available to others, use the "Test Rule" function to ensure it functions as intended. Test the rule with values that should pass and fail. Once validated, publish the rule or submit it for publishing.
Map DQ Rule to Business Term
Once the DQ rule is published, map it to the term for automatic DQ evaluation. In the "Business Glossary," find and open the desired term. On the "Settings" tab, under "Data Quality Evaluation," add the rule to the appropriate DQ dimension. For general validation, use the Validity dimension. You can add multiple validation rules as needed. Remember to save and publish your changes.
By following these steps, you'll be able to configure effective detection and validation rules in Ataccama ONE, ensuring accurate data categorization and evaluation. Let us know if you have any questions or best practices in the comments below 👇


