Hi community 👋
Ever wondered about the best ways to authenticate GraphQL requests while maintaining security and efficiency?
Whether you’re new to Ataccama ONE or looking to optimize your workflows, here’s an approachable guide to using Service Principle and various authentication methods.
In this first post of two part GraphQL series, I will share authentication types & which one you should use and how to authenticate GraphQL requests. Second part will be on how to work with MMM in GraphQL - so watch out this space for that!
Let’s get into it👇
⚙️API authentication
User Accounts vs Service Principles
User accounts and service principals serve different purposes in identity and access management.
User accounts are designed for (unsurprisingly!) human users, providing them with access to applications and resources based on their roles and permissions. These accounts typically require interactive login with credentials like usernames and passwords.
Service Principals, on the other hand, are essentially user accounts where the user is a program. They are ideal for scenarios where automated processes need to interact with APIs or other services without relying on human intervention. These continue to work when people leave a company, and reduce security attack vectors when properly set up with only the minimal permissions required for its exact task (instead of for everything an end user requires), and can be monitored as such.
For GraphQL, DPM runtimeConfig connections, etc, it is therefore best practice to use a Service Principle.
Practical Example: Making a Service Principal 🚀
To set up a Service Principal in Ataccama ONE:
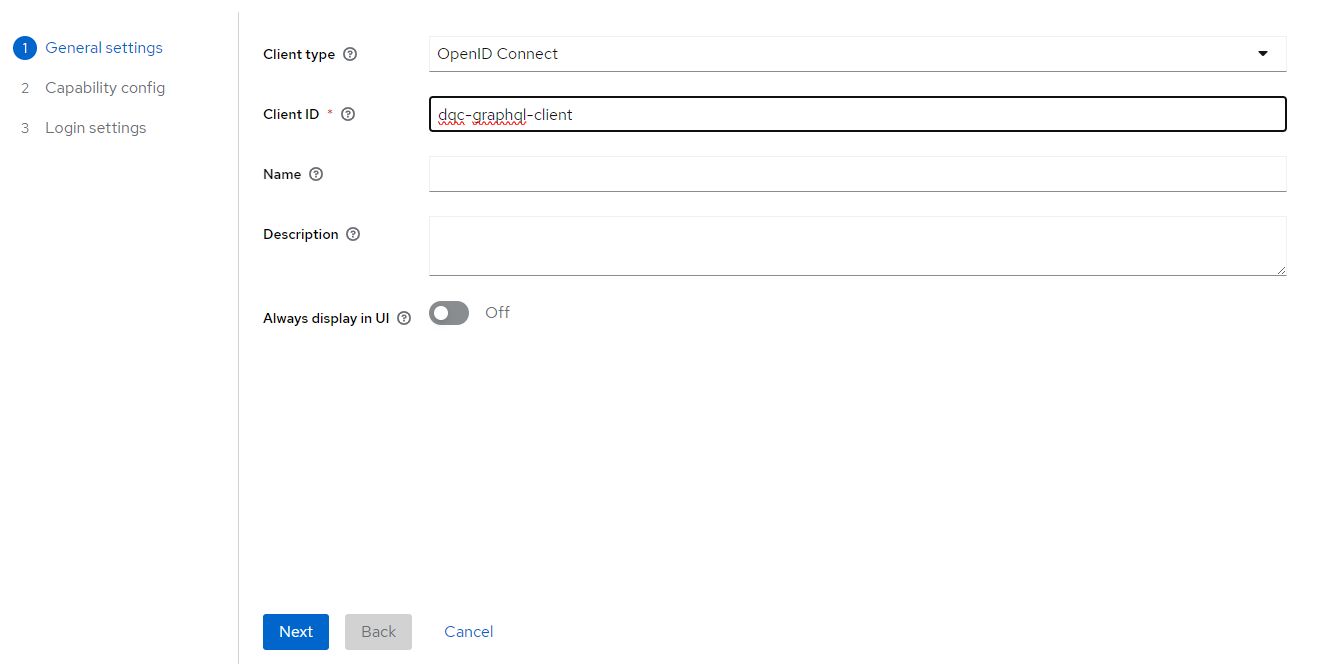
- Go to the Keycloak realm, navigate to Clients, and click Create Client.

- Fill in a Client ID, enable Service Accounts Roles, and save.

-
Now, we need to set this up as a userless Service Account. Ensure that:
- Client Authentication = On
- Standard Flow = Off
- Service Accounts Roles = On
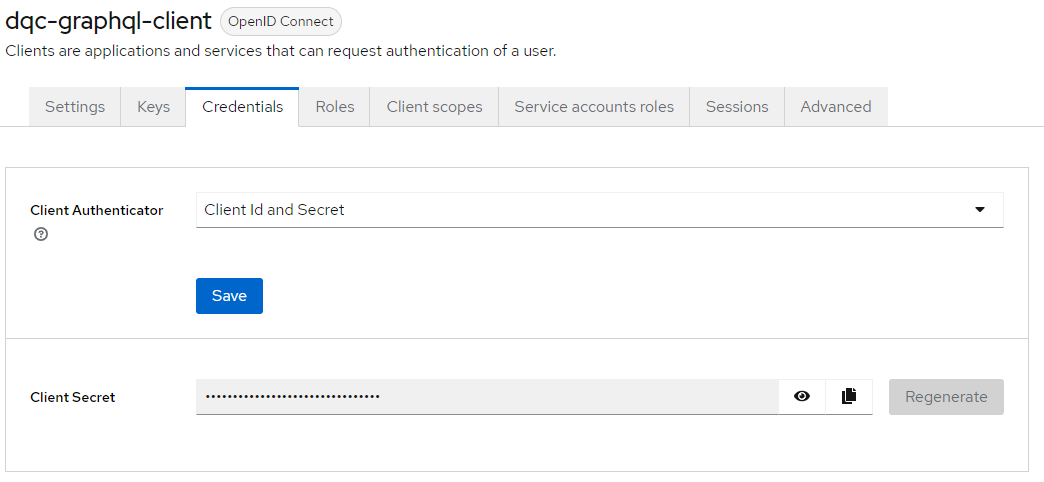
Press Next, do not change the Login Settings, and save. In the Credentials tab, you should see that the Client Authenticator is already set to Client ID And Secret. The Client Secret (aka password) will have been auto generated for you.

Now all we have to do is give it permission to use GraphQL! Navigate to Service Account Roles, and apply the roles DMM_Public_API.
If you also wish to see the GraphQL schema (which you should!), also apply the role MMM_graphql-introspection.
💡In non Portal environments, you may need to go to MMM settings and set ataccama.one.mmm.api.introspection.enabled = True
ataccama.one.mmm.api.introspection.roles = MMM_graphql-introspection.
Authentication options: What works best? 🔒
Ataccama provides several authentication options tailored for different use cases. Let’s dive into the most popular methods:
1. Basic user + password
Basic user/pass authentication is the simplest way of authenticating anything. However, it is only suitable for ad-hoc testing/development, and never in production environments.
For situations like ONE Desktop connecting to ONE Platform, you can enhance this by selecting the OpenID auth type instead. On DPM runtimeConfig, you can use a service principle with client id/secret as the ONE Desktop password, instead of a generic user account. If you are using ONE Desktop, you may find it more secure to use Web Login, which allows authentication via SSO against an Active Directory via Keycloak.
2. Bearer Token Authentication 🛡️
Bearer Tokens are a secure and time-limited way to grant access reducing the risk of credential theft. Additionally, tokens can be scoped to specific permissions, adhering to the principle of least privilege, and they eliminate the need to store or transmit user passwords, further enhancing security. Here’s how you can generate one manually:
Use your Client ID and Client Secret to authenticate against Keycloak’s API at <env_url>/auth/realms/ataccamaone/protocol/openid-connect/token
You’ll receive a token which can then be included in the HTTP headers of subsequent API requests as Authorization: Bearer <token>.
💡Pro Tip: Some programs (e.g. ONE Desktop and Postman) can automatically generate, authenticate and refresh bearer tokens in the background.

Authenticating (GraphQL) requests
1️⃣ via Postman
Postman is a great way to debug and ensure that your API requests are set up/working properly, especially as ONE Desktop is difficult to use and configure correctly.
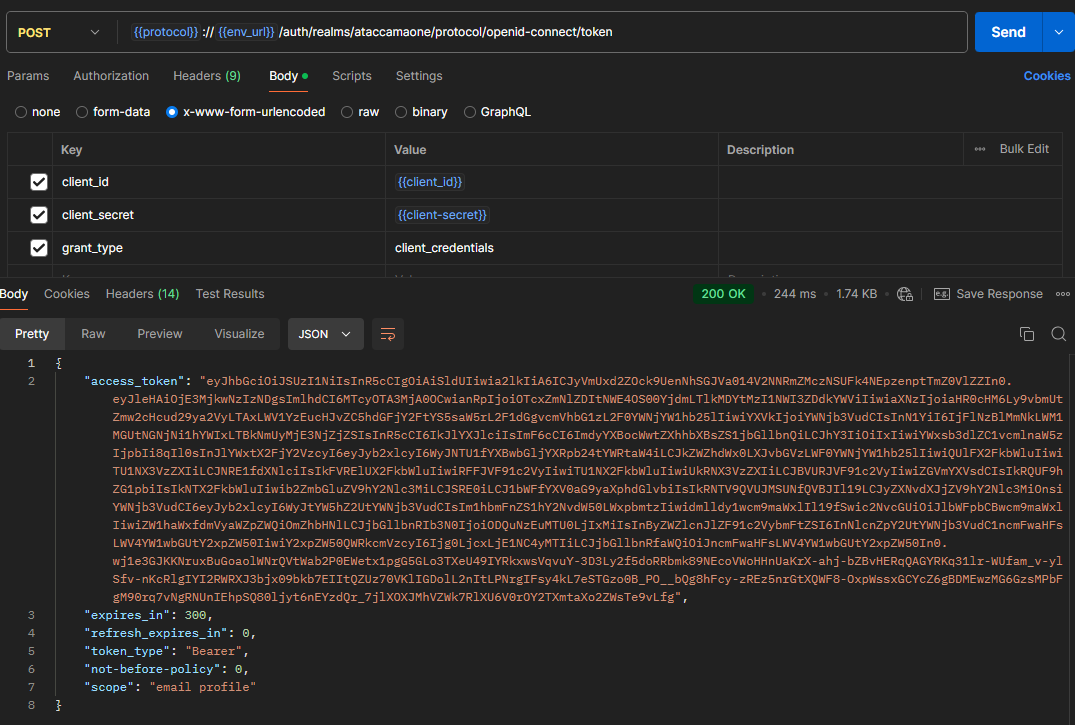
To get a bearer token manually, make a POST request to
<env_url>/auth/realms/ataccamaone/protocol/openid-connect/token
with Body Type of x-www-form-urlencoded, and the following Body:
- grant_type : client_credentials
- client_id : <your_client_id>
- client_secret : <your_client_secret>
You can then copy the access_token from the response
To run a GraphQL query, make a new POST request to <env_url>/graphql. Set the Authorization Auth Type to Bearer Token, and paste in your access token (without quote marks). Then set the Body to GraphQL, and write your query:
Alternatively, you can skip the need to get a bearer token via a separate query, by setting Auth Type = OAuth 2.0, and setting the Access Token URL, Client ID and Client Secret fields accordingly.
2️⃣ GraphQL Playground 🎢
Most deployments have an inbuilt GraphQL playground at <env>/playground, which you can use to run GraphQL queries without having to use any extra programs. This can be super useful for development/ad-hoc purposes.
When using the playground, you will get an Unauthorized response unless you provide some authorization via the HTTP Headers section at the bottom.
Since this is just a playground, a service principle + bearer token is often too overbearing, and so you may want to just use a traditional user with username/password authentication (e.g. the admin account). You would provide this by:
- Base64 encoding a string in the form of <user>:<password>
(for example, admin:123456 is base64 encoded as YWRtaW46MTIzNDU2) - Use the HTTP Header {“Authorization”: “Basic YWRtaW46MTIzNDU2”}
- ⚠️Be aware that quotation marks may not copy/paste correctly.
3️⃣ via ONE Desktop
For most production use cases today, we are limited to ONE Desktop’s way to send API requests.
In order to ensure that passwords do not get stored plaintext via plan steps, we must first set up a server (and if not running locally, generate a runtimeConfig and apply it to DPM). Set Authentication to OpenID Connect, use the client id/secret, and set the token endpoint to <url>/auth/realms/ataccamaone/protocol/openid-connect/token.
If this plan will be run on the environment itself, be sure to update runtimeProperties on the DPM.
💡You can also get a bearer token by setting the server to have Basic authentication, and making a JSON call step with grant_type=client_credentials as the Input Template and Content-Type = application/x-www-form-urlencoded in the headers.
Next, hit an API by using the workaround in which we make a Random Record Generator step with 1 record, then connecting this as a meaningless input into a JSON Call step.
In the Input Template section, write your query in the form
{"query": “<graphql_query>”}
It is recommended to use the playground to develop your query, then use the Copy Curl button and remove the extra generated text. Your query will then look like:
'{"query":"query getProfileData {\n catalogItems(\n versionSelector: { publishedVersion: true }\n filter: \"name = 'customers'\"\n ) {\n edges {\n node {\n publishedVersion {\n catalogItemName: name\n profilingConfigurationInstances(size: 1) {\n edges {\n node {\n publishedVersion {\n profiles(\n orderBy: { property: \"profiledAt\", direction: DESC }\n size: 1\n ) {\n edges {\n node {\n publishedVersion {\n attributeProfiles(\n filter: \"displayName = 'customernumber'\"\n ) {\n edges {\n node {\n publishedVersion {\n attributeName: displayName\n attributeProfileData {\n publishedVersion {\n numMax\n numStdDeviation\n }\n }\n }\n }\n }\n }\n }\n }\n }\n }\n }\n }\n }\n }\n }\n }\n }\n }\n}\n"}'
4️⃣ via Python 🐍
Unlike ONE Desktop, sending API requests is basic Python, and as such, you can use either the built-in library urllib or the fantastic and industry-standard requests package.
You can also configure custom logic to refresh the Bearer Token should it expire mid-execution. The following Python SDK will do this automatically for you.
import requests

# Get the Bearer Auth Token
token_resp = requests.post(
	"<url>/auth/realms/ataccamaone/protocol/openid-connect/token",
	data={"client_id": client_id, "client_secret": client_secret,
		"grant_type":"client_credentials"},
	headers={"Content-Type": "application/x-www-form-urlencoded"}
	)
token_resp.raise_for_status()
token = token_resp.json()["access_token"]

# Make a GraphQL Request
req_resp = requests.post("<url>/graphql",
				json={"query": <graphql_query>},
				headers={"Authorization": f"Bearer {bearer_token}"})
req_resp.raise_for_status()
output = resp.json()["data"]
This is all from the first part! Next up is working with MMM in GraphQL. If you have any questions or tips please share in the comments below👇


