


Use Case: Send records from Kafka to Ataccama IDE for parsing and other transformations and send this data to database tables
Beginning set up for Kafka with MDM:
⦁ The first thing you would need to do is add the Kafka configuration to the runtime configuration file, for usage in the server

-
The configuration should be in this format as in the picture above, where you provide the connection string, key, trustore, and keystore passwords
-
You will also need to add this information into the serverConfig file as well, naming the server as you would like between the string tags

-
Once the file configurations are ready for you to connect to Kafka, you can then start adding your streaming information into the model explorer
-
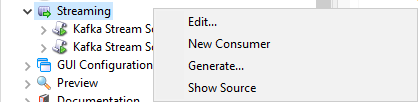
The first step would be to right-click on the STREAMING button in the model explorer
-
From there you would need to click New Consumer
-
You would then click Kafka Stream Source, to create a new kafka streaming source and configuration
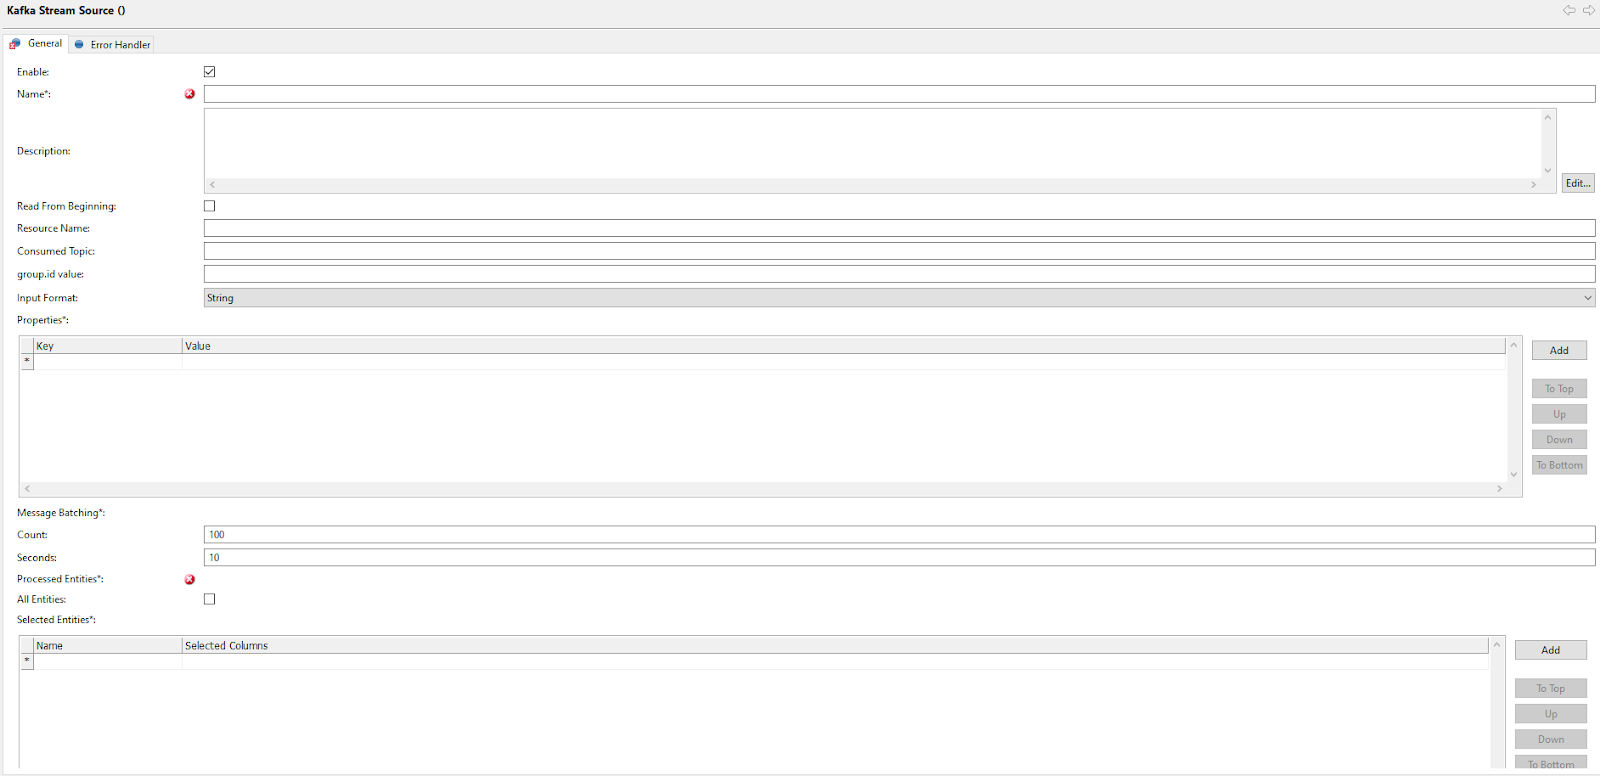
Above is the screen you should see to start filling out the information. Before filling anything out, make sure the enable box is checked so the streaming will work.
-
You will then have to enter a name for the kafka streaming consumer (ex: Stream_example_ata)
-
If “read from beginning” is enabled, all records will be consumed (read in), regardless of previously already read, so pay attention to that
-
The resource name should be the same name as your Kafka connection that you added to the configuration files
-
The consumed topic will contain the topic name, a kafka server can have many topics, so make sure you are using the correct topic with the correct data in it
-
Group.id value should contain the consumer group value
-
In the properties, you will be adding your deserializes (if you are connecting to MDM)

-
The deserializers should look as above
-
Next for message batching you can pick any amount you'd like, I usually go with 1000 count and 10-second
-
Then for selected entities, you can select which entity integration outputs you would like to have generated for your kafka streamer
-
Finally, for transformer type, you would want to select “plan transformer”
-
In the case, you want to handle errors (aka, don't let the consumer close on error) go to error handler table, and enable error handler, for window size make sure its 1 number larger than your batch count, the and threshold should be the same number as your batch count. For error handler consumers, you should log to file and give it a file name
-
At this point you should have the configuration set up, when the streamer file is generated, you should have the entities that you selected as integration outputs and an integration input
-
From here, you would need to have all entities in the streaming configuration file present and active (no errors) if you would like to run it
-
To then turn on the streamer you would go to the admin center, then STREAMING CONSUMERS under MD interfaces, and then turn on your streamer
Depending on if you put any databases or any files, you should see them being populated.
Use case: Send and Read in Kafka messages using orchestration server
Set up for kafka using orchestration server and local host:
-
You would need to first go to the file explorer tab and then scroll down to servers and create a new server connection
-
There you will fill out all the information needed including:
-
Implementation: Kafka
-
Name
-
Connection string
-
Properties
-
Should be: security.protocol, ssl.truststore.location, ssl.keystore.location
-
-
Add in the password values for those properties above
-
You can then click on “finish” if you don't need any more information.
Write to Kafka Local and orchestration
You can now create a new kafka write step by following the instructions below:
-
Add the new kafka server name that you picked above, enter the topic name for the topic you will be writing to, and select the encoding (I usually pick UTF-8)
-
If a partition key is used you would enter it here
-
Next move to the output format tab
-
Select which template you need, I usually go with template output format and create the template accordingly
-
For the last tab (properties) you do not need to add the deserializes, if you do then it might not work at all
You can now connect all your other steps to this kafka writer step, run, and it will start writing to kafka.
Read from Kafka
For reading in, assuming you already added the server to your server connections, you will need to add the kafka reader step into your plan
-
Then, add the following information:
-
Server name
-
Topics
-
Encoding
-
Group id
-
Timeout
-
-
If you want to read every message ever sent to this server, you will need to checkmark the read from the beginning box, if not leave it unchecked to read new messages only
-
Next, select an input format from the input format tab, I usually select STRING INPUT FORMAT and have my messages come in by the name MESSAGE as the column name
-
Properties and shadow columns can stay empty
You can now connect the reader to a text file writer and start reading in from the topic. Please don’t hesitate to share your questions in the comments below.