
Hi Community!
This week on the menu we have how to work with the Ataccama ONE Platform. We will cover basics like how to connect your ONE Desktop to a bit more advanced topics like working with metadata.
Connecting your ONE Desktop to the Ataccama ONE Platform allows you to seamlessly work with metadata, create data quality rules, and utilize virtual catalog items.
Create a New Connection
Prerequisites:
- Ensure ONE Desktop is properly set up and running.
- Your ONE instance should be running and accessible from the server where ONE Desktop is installed.
- Ensure that both ONE Desktop and ONE are using the same version.
Follow these steps to create a new connection:
-
Open ONE Desktop.
-
In the ONE Explorer, select Create a new server.
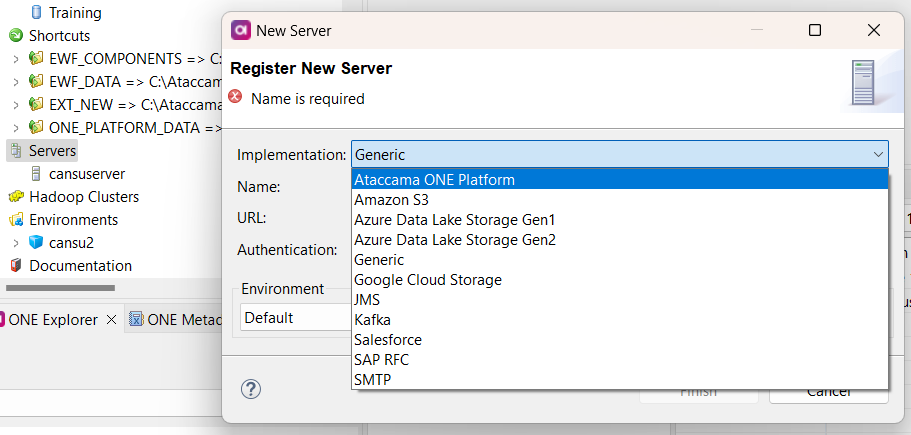
If you are adding a second ONE server, follow these steps instead: In File Explorer > Servers, right-click Servers and select New > ONE Platform. You can also find the same option in the Servers and Databases tab, which is part of your workspace by default.
-
Provide a meaningful name for the server under Name, and specify the URL of your Ataccama ONE Platform under URL.
-
Choose an authentication option and configure it:
-
OpenID Connect or Basic:
- It's recommended to use OpenID Connect as Basic authentication sends credentials with every request, making it less secure.
- With OpenID Connect, users are authenticated and authorized through Keycloak for the session's duration. User credentials are only used to retrieve identity and access tokens at the beginning of the session.
- Provide your username and password.
-
OpenID Connect via Web Browser:
- Select Login and confirm when prompted.
- Provide your credentials in the browser. If you are already authenticated, no further action is required.
- Check the connection status in ONE Desktop. If the login was successful, you'll see the message: "Authentication to ONE Platform through the browser succeeded."
-
-
After providing your credentials, test the connection.
-
If no issues are detected, select Finish.
If the connection couldn't be established, check Details for more information. To view the full error, select Show Stacktrace.
-
The new server will now appear in ONE Explorer. To establish a connection to ONE, select Connect.
You can now explore your data and metadata through ONE Desktop and use them in ONE plans.
-
To disconnect from your ONE server, go to File Explorer > Servers, right-click the server, and select Disconnect. You can also find the same option in the Servers and Databases tab, which is part of your workspace by default.
Manual Server Configuration
In certain cases, server configuration may not be loaded automatically after providing the ONE URL. In such situations, you may need to enter the information manually. Here's how:
| Property | Description |
|---|---|
| URL | The URL where ONE is running, for example, https://<CLIENT>.<ENV>.ataccama.online. |
| Authentication | Select the authentication option and provide the necessary details. |
- Type: Basic, OpenID Connect, or OpenID Connect via Web Browser. It's recommended to avoid Basic authentication due to security concerns.
- Token URL: The Keycloak URL, for example, https://<CLIENT>.<ENV>.ataccama.online/auth.
- User: The username for ONE, used for Basic and OpenID Connect authentication options.
- Password: The user password, used for Basic and OpenID Connect authentication options. | | ONE Metadata Server | Provide the following information for the Metadata Management Module (MMM).
- GraphQL URL: The GraphQL URL for ONE, for example, https://<CLIENT>.<ENV>.ataccama.online/graphql. | | ONE Data Processing | Specify the following details for Data Processing Manager (DPM).
- Admin Console URL: The URL where DPM Admin Console is accessible, for example, https://dpm-\<CLIENT>.<ENV>.ataccama.online.
- gRPC Host: The gRPC server of DPM, for example, https://dpm-grpc-\<CLIENT>.<ENV>.ataccama.online.
- Port: The gRPC port of DPM, with a default value of 443.
- TLS: If selected, TLS is enabled (default and recommended).
- Public key: The public key for DPM.
Manual configuration should be used as a fallback option, as it is more error-prone and time-consuming.
By following these steps, you can establish a secure and efficient connection between ONE Desktop and the Ataccama ONE Platform, facilitating your data management and data quality efforts. Let us know if you have any questions or your best practices in the comments below 