
Hi everyone,
This week’s last best practice is on how to import terms from ONE Desktop  ️
️
In data governance, importing terms is a crucial step. Using ONE Desktop, you can streamline this process by batch-importing terms into your ONE Web Application instance. This guide walks you through the process of importing terms from a CSV file into your ONE instance using the Text File Reader and ONE Metadata Writer steps. Please note that while we use the Text File Reader in this example, you can choose alternative input steps like JDBC Reader or ONE Metadata Reader.
Step 1: Prepare Your Term File
Begin by preparing your term file. In this example, we have a CSV file called party.csv, which contains several terms:

Step 2: Create a New Plan
Create a new plan in ONE Desktop. Simply drag and drop your term file into the plan. This action will automatically generate a new Text File Reader step.

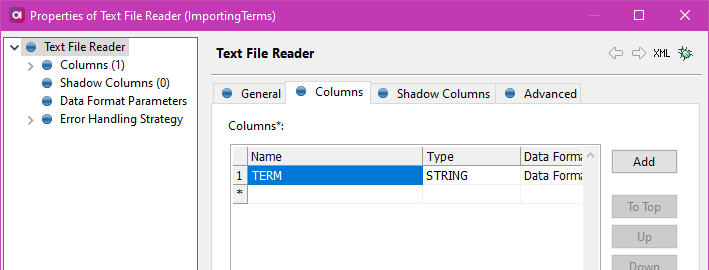
Step 3: Edit Text File Reader Properties
Edit the properties of the Text File Reader step:
- In the Columns section, add the name of the column from your data file (in this case, "TERM").
- Set the correct data type for your column.
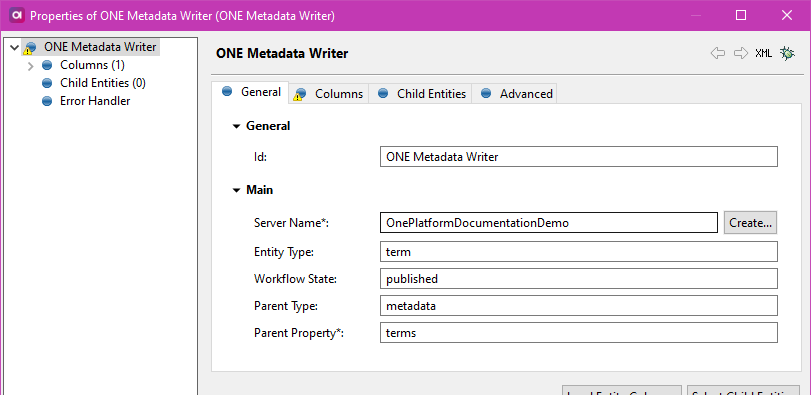
Step 4: Add a ONE Metadata Writer Step
Now, add a new ONE Metadata Writer step and edit its properties:
- Select your ONE Platform Server Name.
- Choose "term" in the entity types.
- Select the Workflow State for the terms.
- Choose "metadata" as the Parent Type.
- Select "terms" as the Parent Property.
- In the Columns section, add a new Entity Column of the 'name' type and include the name of the column from your data file (e.g., TERM).
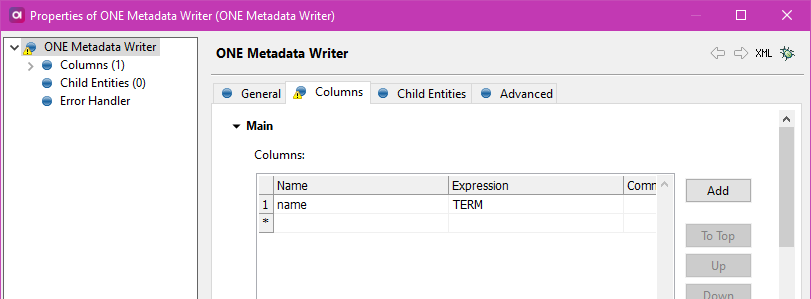
- Enter a Created GID Column Name (e.g., TERM).
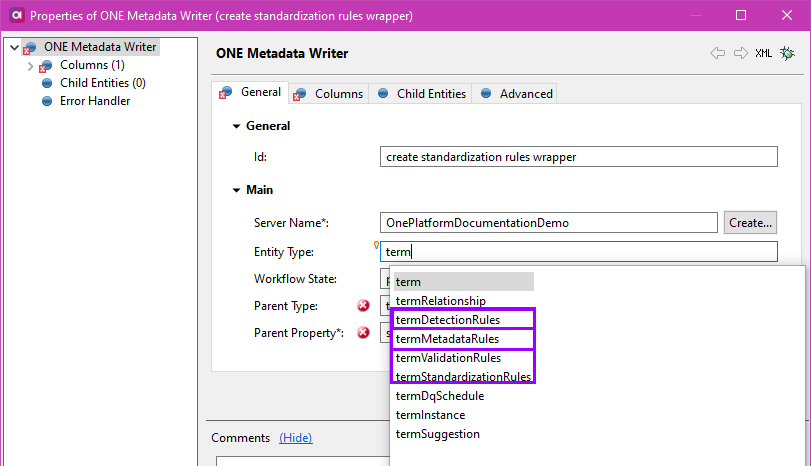
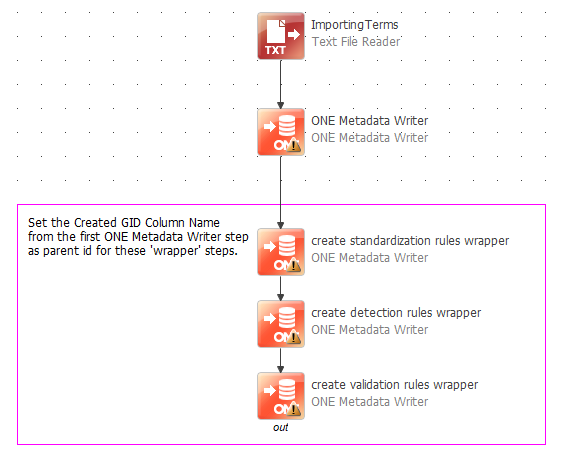
Step 5: Create Three More ONE Metadata Writer Steps
To assign rules to your imported terms in ONE, you'll need to add three more ONE Metadata Writer steps. These additional steps work as 'wrappers' for standardization, detection, and validation rules. Configure these steps as follows:
For the standardization step:
- Select the same ONE Platform Server Name as in the previous steps.
- Choose "termStandardizationRules" in the entity type.
- Select the Workflow State for the terms.
- Set "term" as the Parent Type.
- Choose "standardizationRules" as the Parent Property.
- In the Columns section, for Standardization 'wrapper' step, Load Entity Columns and add an "enabled" column with its value set to
true.
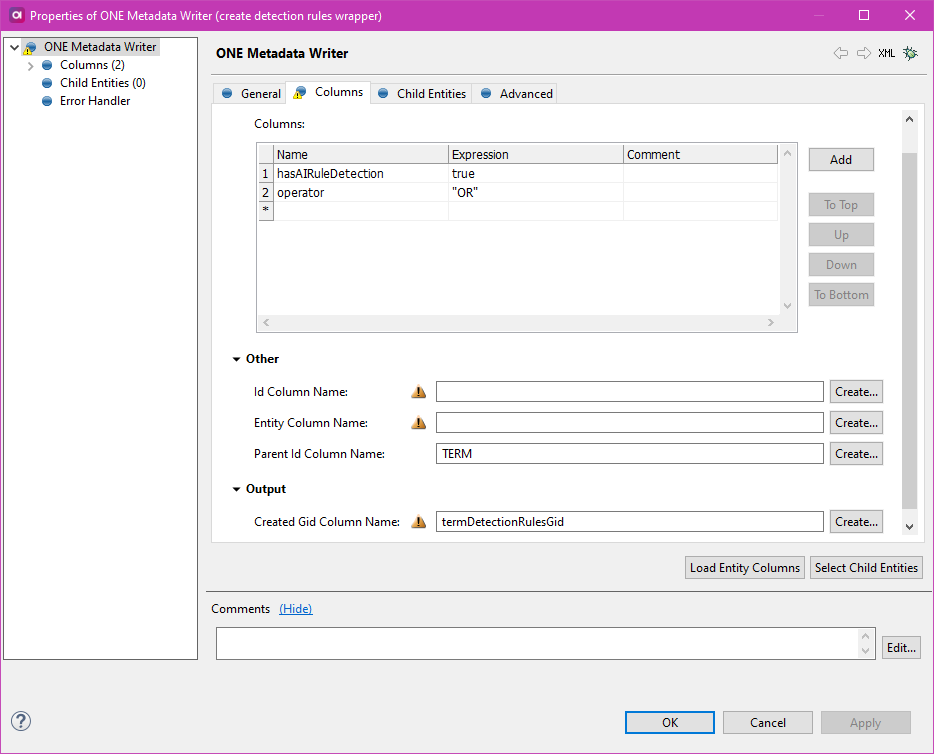
For the detection step:
- Select the same ONE Platform Server Name as in the previous steps.
- Choose "termDetectionRules" in the entity type.
- Select the Workflow State for the terms.
- Set "term" as the Parent Type.
- Choose "detectionRules" as the Parent Property.
- In the Columns section, for the Detection 'wrapper' step, Load Entity Columns and add "hasAIRuleDetection" and "operator" columns with values of
trueand"OR", respectively.
For the validation step:
-
Select the same ONE Platform Server Name as in the previous steps.
-
Choose "termValidationRules" in the entity type.
-
Select the Workflow State for the terms.
-
Set "term" as the Parent Type.
-
Choose "validationRules" as the Parent Property.
-
In the Columns section, for Validation 'wrapper' step, Load Entity Columns and add an "enabled" column with its value set to
true. -
In the Columns section, for Detection 'wrapper' step, Load Entity Columns, add "hasAIRuleDetection" and "operator" columns with
trueand"OR", respectively. -
Enter the name of the Parent ID Column Name (e.g., TERM).
-
Enter "termStandardizationRulesGid," "termDetectionRulesGid," or "termValidationRulesGid" in the Created GID Column Name, respectively.
Step 6: Run the Plan
Finally, run the plan to efficiently import the terms from your data file into the selected ONE instance.
This process allows you to maintain a structured and organized repository of terms across ONE Desktop to ONE Web App.