Hello everyone, Anna here! I work as a projects consultant in Ataccama and today I put together a guide for you on how to export a metadata model definition from Ataccama ONE.
Ataccama ONE allows to export metadata model definition from the platform into a JSON file. However, the JSON file is not an ideal format for business users. For that reason, parsing of the JSON into more user-friendly format, for instance Excel, is desired. The current JSON parser step in Ataccama DQC, however, is not able to parse this JSON structure.
This article introduces a Python script that was developed to parse the JSON structure of the metadata export and provide the metadata model in Excel and CSV formats. It is supported for v13 of Ataccama ONE.
As a first step, the metadata model has to be exported from Ataccama. Next step is to run the Python script on top of the exported metadata model to obtain the CSV and Excel format. Chapter JSON parser in Python describes in detail the Python script as well as the information available in the output. You can skip this part if you are not interested in the details. At the end of the article you can find out how to test the script on your own.
Export metadata model
The export is available under this endpoint: https://<one-address>/mmd/export. If this endpoint is throwing an error, make sure the following property is configured in the MMM backend application.properties:
ataccama.one.mmm.core.export-mmd=true
The MMM backend module needs to be restarted if you modified the properties.
Also, it may happen that the endpoint is not exposed as public URL (due to nginx), which needs to be configured. In this case contact out support engineers if you are not sure how to configure it.
JSON parser in Python
This chapter describes in detail the python script so that you can be modified if needed.
Libraries
Following Python libraries are needed:
- pandas
- simplejson
- csv
Input
The parser script expects the metadata model json5 file in an /input folder. The name and the location can be changed on line #41:

The metadata model is handled as a dictionary, that contains other dictionaries. To work easily with the dictionaries, two functions are defined on the beginning of the script:
Functions
get_dic(dic, key)
This function takes a dictionary and returns another, inner dictionary:

get_val(dic,key)
This function returns the value from a dictionary for a given key. A primitive value is expected.

store(…)
Each record of the model is stored as an array and storing is done using another function, which at the same time translates some Boolean properties (e.g. reference) into string values for the property type:

Reason is, that if a property is primitive (e.g. String), the value is provided under a “type” key in the “type” node:

If it’s an object, the “type” node has no “type” key, instead there is ”true” for one of the remaining properties, e.g. “array”:

The function above will translate these values into string names of the object data types as we know them from the application, e.g. “Embedded Object”.
Parsing the dictionaries
The data from the file is loaded using json.load() function. The nodes part (main part of the model, that contains the actual model definition) is then extracted into a dictionary using the get_dict() function described above.
Metadata export file:

Script:

Parsing of the nodes is done in two for-cycles. First one loads other dictionaries that corresponds to the actual entities (e.g. metadata, term) using the key “node_name”. From these dictionaries, a string value for node “extends” is extracted (indicates from which entity it inherits) if exists.

Properties of the entities are loaded as another dictionary “props” and parsed in the second for-cycle.

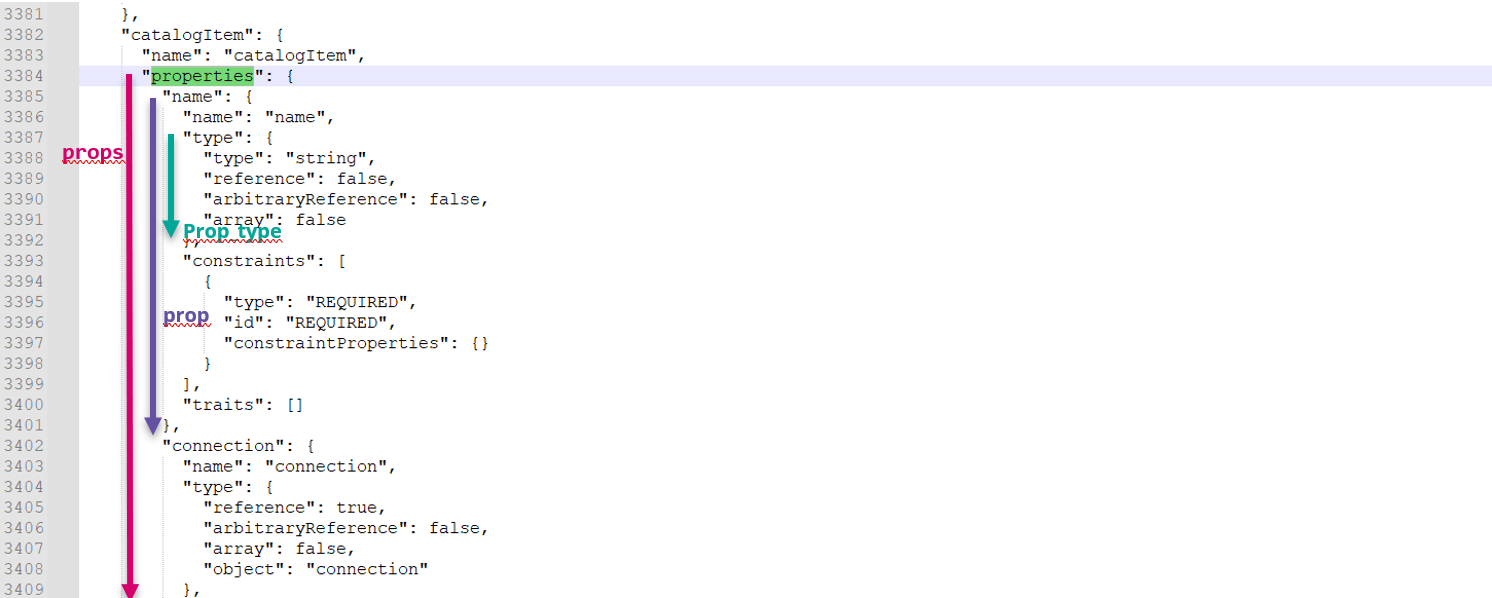
From this properties dictionary, another dictionary is created for each property by the name key (“prop”). From this dictionary, we can get the type of the property again as dictionary (prop_type) with Boolean values corresponding to array, reference etc. See the picture capturing the nested dictionaries:

All the properties as well as name of the entity are then sent to the store() function, see above.

Writing to output
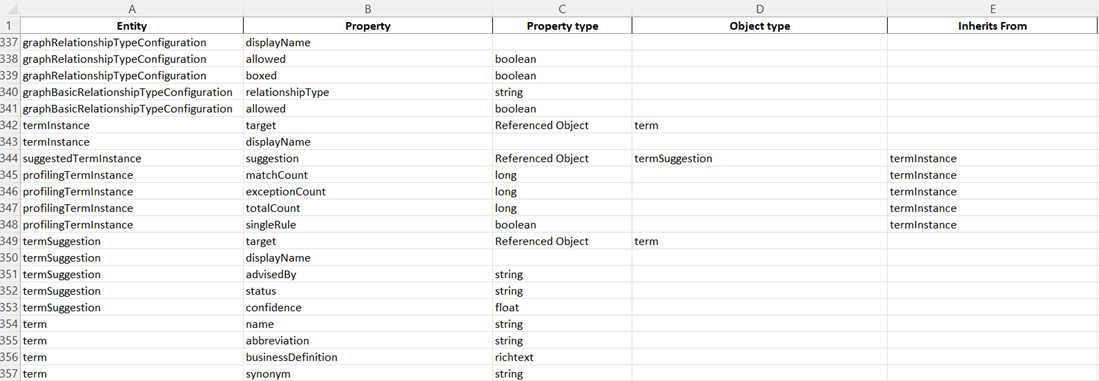
All rows created in the store() function are written into a CSV file using the csv.writer and writerow() function. Pandas library is then used to transfer this CSV file into Excel file. In this section you may change the location of the output files, which is set to output folder (relative to the python script location).

Example output:

Limitations
- Current implementation is not parsing constrains, traits or indexes or plugins.
- Arbitrary reference type is ignored.
- Computed content is not parsed.
- Delegated scalar properties are not parsed properly (missing property type).
How to Try it Out
Attached to this article is the python script as well as an example input and ouput files.
Make sure you have python installed: https://www.python.org/downloads/. Then you have to install the required packages. You can refer to this guide:
https://packaging.python.org/en/latest/tutorials/installing-packages/
You can run the code from command line, simply use:
$ python <path_to_the_script>/export_mmd_model.py
Make sure you have the expected input and output folders ready with the metadata model input file (see the section Input and Writing to output) OR that you modified the code to fit your needs.
If python command is not recognized, you have the following options:
- Add the python executable path to your Window's PATH variable. https://stackoverflow.com/questions/7054424/python-not-recognized-as-a-command
- Download Pycharm (Python IDE) and run it from there. https://www.jetbrains.com/pycharm/download/#section=windows
