What is LDAP?
LDAP is directory that stores companies usernames, passwords, email addresses, connection information and much more. It is usually used due to it's ability to allow hundreds of active connections at any given point.
In terms of configuration and connectivity, in Ataccama we authenticate/authorize through a 3rd party tool called Keycloak.
Items to consider prior to connecting to LDAP - Best Practice
You first need to understand how your organizations Active Directory is setup. Some pre-requirements needed can include things such as:
- Do you have a list of groups you need to import?
- If the answer is no, you may want to speak to your engagement manager from Ataccama to discuss in detail. In short, LDAP groups is a way where we can map Ataccama Roles to a single group. This will heavily assist in ease of maintenance going forward and not leave your devops team stuck doing manual work such as adding/removing new users each time someone is added/removed from LDAP.
- Once you have decided on the number of groups/users, you must then submit a request within your organization for these to be created. How long this takes, will heavily depend on your internal processes. Without these being created, you will not be able to proceed with the LDAP configuration.
- Best practice is to ensure you have 1 group per role you are going to assign within Ataccama. You want to ensure that your LDAP groups are flexible enough to support 1 role - 1 group mapping. Some organizations decide to map 1 role - many groups.
- Have you decided what permissions each LDAP group should have in regards to Ataccama?
- If the answer is no, please contact your assigned engagement manager or visit our documentation portal to understand the default roles/permissions available to you at Roles and Permissions. This is a very important step in you are looking to build a data governance process and ensure that certain aspects of the Ataccama tool are restricted for their respective groups/users.
- Best practice is to have a meeting in advance to discuss the various roles you have within your organization. This is very important as we will need to map your permissions to Ataccama roles. This will also have a major impact on how your groups in LDAP will be created and mapped to your users.
- Consider the LDAP attributes
- Because Active Directory allows you to structure all attributes at the organization level, you must confirm with your devops/security team for these attributes. The list is as follows:
- Username Most organizations have the default value set to cn or sAMAccountName.
- RDN This is usually the same value as username. But confirm with your team to ensure the correct attribute
- User Object Classes By default, this is usually person/organizationalPerson or user. Some customers have disabled/removed 2 of the 3, so please confirm which is appropriate for your organization
- Best practice is to ensure you have all the above attributes before rushing to setup LDAP. We also recommend having an LDAP expert from the customer side during the call for configuration, so that there is not delays in getting it completed. In most cases, there is some of query tweaking needed and it would be ideal to have someone knowledgeable of the LDAP system available to speed up the process. Alternately, you can install a LDAP/AD query tool such as Apache Directory Studio to connect yourself and begin creating the desired query
- Because Active Directory allows you to structure all attributes at the organization level, you must confirm with your devops/security team for these attributes. The list is as follows:
- Ensure you have the LDAP connection information
- Most importantly, ensure you have the connection string for the ldap server. The format will depend on if you are going to proceed with SSL (LDAPS) or non-SSL (LDAP).
- For non-ssl, an ldap server is ldap://[ldap_domain_name]:[port_number]. The default port is 389
- For ssl, an ldap server is ldaps://[ldap_domain_name]:[port_number]. The default port is 636
- For SSL, ensure you ask your security team for the certificates needed to import into the java key store on the dependency server (Where keycloak is installed). This will need to be generated on your organization and imported into the Ataccama dependency server
- Service account credentials Ensure you have a service account for the purpose of Ataccama tools. It's highly recommend you have a separate account for Ataccama. It will help with future debugging and ensures that this is the only account you have access to
- There is no best practice as this will heavily depend on the requirements from your internal security team and how they have configured Active Directory
- Most importantly, ensure you have the connection string for the ldap server. The format will depend on if you are going to proceed with SSL (LDAPS) or non-SSL (LDAP).
- User location in Active Directory
- This is extremely important when we discuss where the users exists within your Active Directory. Ensure you ask your team what the path query is for all users. Having the wrong path defined can lead to some users being excluded.
- When working with large organizations, you will over thousands of employees. The last thing you want to do is import every single user into keycloak. Instead, you want to ask your security team for the LDAP user query for the users you want to import and not all.
- Best practice is to ensure it's pointing to the correct path. You need to make sure this is where all the users of your organization exists along with filters to only import the users you need. You want to ensure flexibility exists otherwise maintenance in the future can become quite painful
Once you have all the above information, then you are ready to proceed to the actual configuration of LDAP with Keycloak 🎉
Steps to create an LDAP connection
Before going through the following steps, please ensure you have your keycloak location (serverDomain:port/auth) along with the credentials to login. Also, upon logging in, at the top left hand corner make sure you are selecting the realm that you want to enable LDAP on. Ataccamaone will be for all Ataccama related applications and Master is for keycloak login directly.
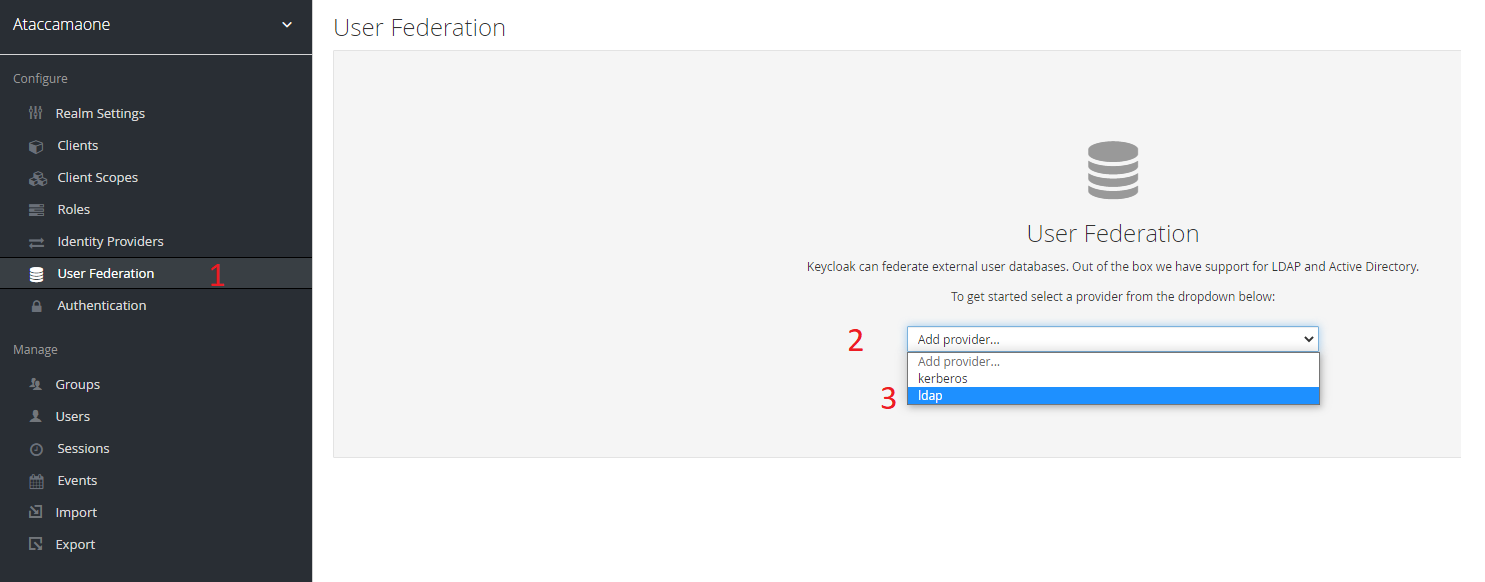
- Ensuring you select LDAP
- Navigate to "User Federation" and select it as seen in the image
- Select the drop down menu
- Select "LDAP"
Lastly, feel free to change the console display name from "ldap" to anything you prefer. Ataccama recommends organizationAbbriviation_ldap. Example: ata_ldap
- Edit Mode This option allows you to write back results to LDAP or to only read information form LDAP. Ataccama recommends leaving this set to READ_ONLY so you do not interfere with your organizations Active Directory system.

- Navigate your way to the field labelled "Edit Mode".
- You want to ensure that this is set to "READ_ONLY". This is very important as you do not want to allow keycloak to make changes to your LDAP system.
- Vendor
- Navigate your way to the field labelled "Vendor"
- Now select the value from the drop down option. Most organizations are "Active Directory" however, please consult your team for confirmation

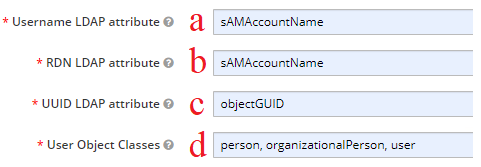
- Username LDAP Attribute, RDN LDAP Attribute, UUID LDAP Attribute, User Object Classes
- Username LDAP Attribute by default is normally cn or sAMAccountName
- RDN LDAP Attribute is normally the same as (a), but it can vary
- UUID LDAP Attribute is normally objectGUID unless the default has been over-written
- User Object Classes by default is "person,organizationalPerson, user". Some organizations remove/add classes. This will be determined by how loose/restrictive you want the search to be
- Connection URL This is where you will provide your LDAP server location along with the port you are using.
Default Non-SSL Port: 389.
Default SSL Port: 636.
Please seek your team to confirm port number if defaults are not used
- Users DN This will be the full path on your AD where all users will exist. Please ensure this is the correct path as having this incorrectly defined can lead to some users not being found.
An example path will look like:
OU=Office,OU=Users,OU=Department,DC=Company,DC=net. As seen in the example, you can have many OU's before you get to the location you are searching for. - Custom User LDAP Filter In any organization, you will have anywhere from a couple hundred employees upwards of hundreds of thousands depending on your size. This is an attribute that is very important to fine tune which users you want to restrict the tool to search for. Typically, this is done via the memberOf attribute. AD allows users to be members of many different groups. It's highly recommended to create a custom filter to only pull the users you intend to either view, edit or develop within Ataccama. All ldap queries must be enclosed with ( ).
Example: (memberOf=CN=Department,OU=GroupLocation,DC=CorpName,DC=net) The above query would result in only users belonging to a certain Department being allowed to login or even searched - Search Scope Depending on the design of your AD, you will have to choose between 2 options explained below.
- One Level - This will only search exactly 1 directory under the above Users DN search query
- Subtree - This will search for every directory under the above Users DN search query

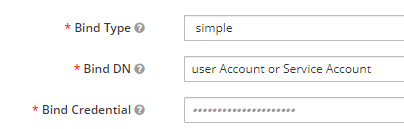
- Bind Type, Bind DN, Bind Credential Bind Type - This can only be none or simple. The decision will depend on if your AD system require credentials to access (such as a service account) or if its open to anyone to read. If there is no security, it will be set to none and you will not have to configure Bind DN and Bind Credential below, however if you do have credentials you will always select simple.
Bind DN - This is usually a user account or an email. Ataccama recommends to have a service account for this purpose.
Bind Credential - This is just the password for the above Bind DN.